
Scheduled Actions
Package: BASIC
1. General
Actions of an [Automation]() can be configured with a time delay. The Scheduled Actions module lists all such time-delayed actions that are to be executed at a later point in time. It serves two purposes:
- Overview of which time-delayed actions of an automation are executed and when
- The option to prevent or stop the execution of scheduled actions
Records in the Scheduled Actions module cannot be created or edited manually – they are created exclusively by an Automation.
An automation is intended to send an email at a later point in time. Before the action is executed, the send is to be prevented. The corresponding action is located in the Scheduled Actions module and removed from the list via Delete. The email is thus no longer sent.
An administrator wants to check which time-delayed actions of a particular automation are still pending. In the Scheduled Actions module, the list can be filtered by the Automation field to retrieve a targeted overview of all actions still pending.
2. List view
The list view in the Scheduled Actions module has the usual functionalities of a list view. For more detailed information, see the section Layout/Structure - List view.
2.1. Actions
The following module-specific actions are available in the list view.
“Actions" button (for records marked via checkbox)
| Action | Requirement | Functionality |
|---|---|---|
| Delete | At least one Scheduled Action marked via checkbox | Deletes the selected scheduled actions and thus prevents their execution – see Section 4. |
“Three dots" actions icon (per row)
After clicking the “Three dots" actions icon in a row, a context menu opens with the following actions:
| Action | Requirement | Functionality |
|---|---|---|
| Delete | none | Deletes the scheduled action and thus prevents its execution – see Section 4. |
| Show details | none | Opens the “Action details" popup with further information about the action to be executed.Note: For emails, the complete email is displayed. |
| Execute at the next possible time | The action must not be of the type “Change contract" | Sets the scheduled execution time to the current time. Execution takes place during the next run of the background task. |
3. Detail view
No custom fields can be created, as the module is not available in the Module management!
3.1. Fields
The following table describes all fields of the module. Since no fields are populated manually, it serves purely for information.
Base data block
| Field | Description |
|---|---|
| Related to | Link to the triggering record |
| Module | Module of the triggering record |
| Automation | Name of the Automation |
| Action | Name of the action within the automation |
| Execution time | Scheduled execution time (date and time) |
| Status | Current status of the scheduled action |
3.2. Actions
The following actions are available in the detail view:
3.2.1. General actions
- Recommend
- Delete → see section Usage
- Change tracking
- Show details → opens the “Action details" popup with further information about the action to be executed
Note: For emails, the complete email is displayed.
For detailed information on the actions, see the section Actions (detail view).
3.2.2. Module-specific actions
Module-specific actions are not available in this module.
4. Usage
To prevent the execution of scheduled actions, individual or multiple actions can be deleted from the list.
4.1. Deleting scheduled actions individually
- List view: In the row of the action to be deleted, click the “Three dots" actions icon and select “Delete".
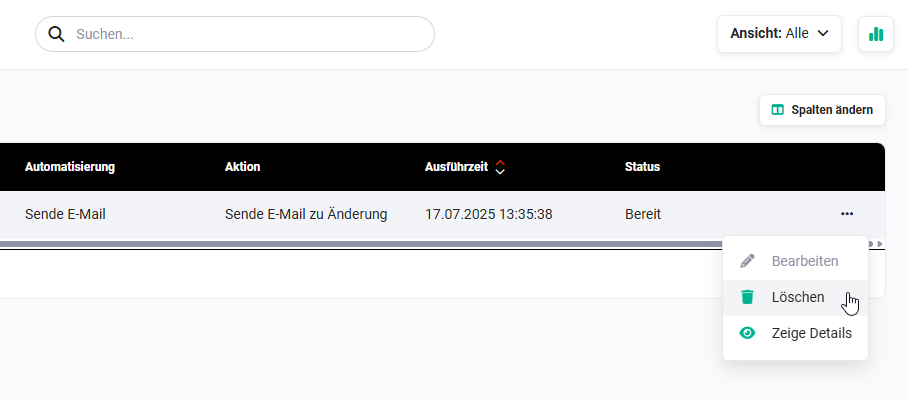 deleting scheduled actions individually
- Detail view: Open the flyout menu via the “Actions" actions icon and select “Delete".
In both cases, a confirmation popup is displayed. After clicking “Confirm", the scheduled action is deleted and no longer executed.
4.2. Deleting multiple scheduled actions
Mark the actions to be deleted in the list view via checkbox, then click the “Actions" button and select “Delete". After confirming in the popup, all marked actions are deleted and no longer executed.
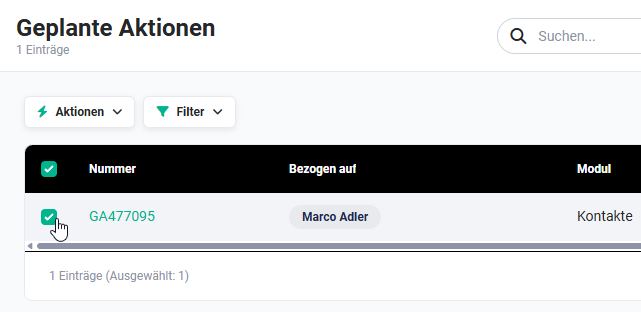 marking scheduled actions via checkbox
5. Practical examples
1 – Stopping a scheduled email send in time
An automation is configured so that, after a status change of a ticket, it sends a reminder email to the customer with a time delay. Shortly after the trigger, the responsible employee realises that the situation has changed and that the email should no longer be sent.
They open the Scheduled Actions module and filter the list by the name of the affected automation. The corresponding action is visible in the list with its execution time and status. Via the actions icon in the row, Delete is selected, and after confirmation the action is removed from the list. The email is thus no longer sent – without the automation itself having to be changed.
2 – Checking the overview of all pending actions of an automation
Before a scheduled system maintenance window, an administrator wants to ensure that no time-delayed actions of a particular automation are executed during this period.
In the Scheduled Actions module, the list view is restricted to the relevant automation via the Automation filter. The filtered list shows all actions still pending with their respective execution time. Actions whose execution time falls within the maintenance period are marked via checkbox and removed collectively via Actions → Delete. This ensures that no undesired processes are triggered during the maintenance.
3 – Checking the details of a scheduled action before execution
An automation for contract renewal has been newly set up and is to be executed for the first time in three days. The responsible administrator wants to check before execution whether the action is configured correctly.
In the Scheduled Actions module, the corresponding record is opened. Via the general action Show details, the Action details popup opens with further information about the action to be executed – for example, which fields are to be changed or which messages are to be sent. Based on this information, the administrator can assess whether the action will be executed as desired, or whether the automation needs to be adjusted beforehand.
6. Frequently asked questions
Can I create or edit records in the Scheduled Actions module manually?
No. Records in the Scheduled Actions module are created exclusively by automations with time-delayed actions. Manual creation or editing is not possible.
What happens when I delete a scheduled action?
The action is permanently removed from the list and no longer executed. The associated automation itself remains unchanged – only this single scheduled execution instance is prevented.
How do I quickly find all pending actions of a particular automation?
In the list view of the Scheduled Actions module, you can filter by the Automation field using the filter function. This displays only the actions of the desired automation.
What does the “Action details" popup show?
The Action details popup opens via the Show details action in the detail view and contains further information about the specific execution of the scheduled action – e.g. which fields are to be changed or which messages are to be sent. It serves as a check before execution.
Can I delete multiple scheduled actions at once?
Yes. In the list view, multiple records can be marked via checkbox. Via the Actions → Delete button, all marked actions are deleted together after confirmation.
Are there custom fields in the Scheduled Actions module?
No. The Scheduled Actions module is not available in the module management, which is why no custom fields can be created. The structure of the module is fixed.