
Automations - Conditions
Package: BASIC
1. Configuring a Condition
Conditions define whether actions should only be executed under certain circumstances.
After clicking a condition in the editor, the "Condition" sidebar opens.
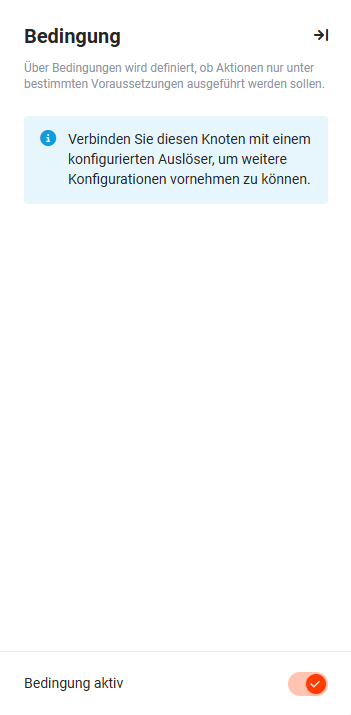 Condition sidebar
A condition can only be configured if it is connected to an already configured trigger!
In the Condition sidebar there are two action icons at the top right and a switch at the bottom:
- Show actions (icon "three dots" - only shown if the condition is configured) → after clicking, a flyout menu with the following actions is displayed:
- Edit → After clicking the "Edit" action, the "Condition" popup opens, in which the condition(s), the name and the description can be entered or changed. In addition, the "Cancellation condition" switch is available.
- Delete → After clicking the "Delete" action, an unconfigured action is deleted without further confirmation.
For an already configured condition: If the condition is connected to other configured nodes, a popup with the text "Do you want to create direct connections between triggers and actions?" is displayed. If no direct connection is created (button "Cancel"), a further popup with the text "Do you really want to delete this node? Subsequent nodes may be reset as a result if they lose the module binding of a trigger." is displayed.
- Show/hide sidebar → the sidebar can be shown/hidden by clicking the action icon "arrow with vertical line"
- Automation active/inactive switch → the switch can be used to set the trigger to active/inactive
After double-clicking a condition in the editor - alternatively via the "Edit" action in the condition sidebar - the "Condition" popup opens.
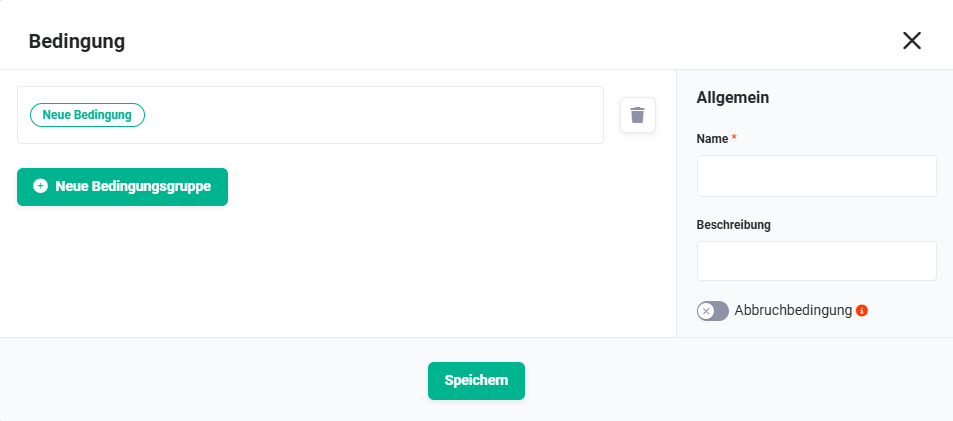 Condition popup
1.1. Condition Step 1 - General
In the "Condition" popup, the following fields are available in the first step:
- "New condition" action button → After clicking the "New condition" action button, the action button changes to "Select module" and a flyout menu with the modules is displayed to select the module the condition applies to → see Step 2.
- "Delete" action icon (icon "trash can") → The entire row of the condition is deleted.
- "New condition group" button → A further row (condition group) of a condition is displayed. Condition groups are linked with the logical operator "and" or "or".
- "General" area → Display/entry of general settings:
- Name * → Entry of an individual name for the condition
- Description → Short description of the condition (optional)
- "Cancellation condition" switch → If there is more than one condition for a trigger, this can be used to determine whether subsequent conditions should also be executed or not.
*Mandatory field
The following (simple) example is intended to explain how a cancellation condition works.
The following example of an automation contains 2 triggers, 3 conditions and 3 actions.
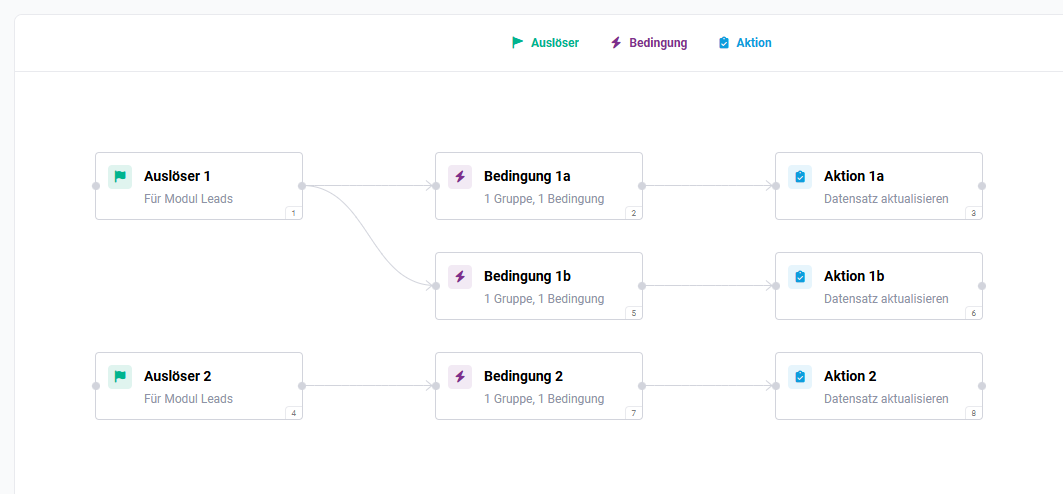
Cancellation condition in condition 1a → If condition 1a applies and is configured as a cancellation condition, action 1a is executed. Condition 1b and action 1b are no longer checked/executed. Trigger 2 is an independent branch and is not affected by this – it is executed independently, provided its event occurs.
- Conditions and actions that directly follow a cancellation condition – i.e. those on the same hierarchy level – are always checked/executed, even if the cancellation condition applies.
- Triggers, conditions and actions that follow the cancellation condition within the same trigger branch are no longer checked/executed if the cancellation condition applies. Triggers in other branches are not affected by this.
- Cancellation conditions serve to conserve system resources, as the execution of further conditions and actions within a branch can be prevented.
- Cancellation conditions are not useful if time-delayed actions follow!
1.2. Condition Step 2 - Select module
After clicking the "New condition" action button (see Condition Step 1), the action button changes to "Select module" and a flyout menu with the modules is displayed to select the module the condition applies to.
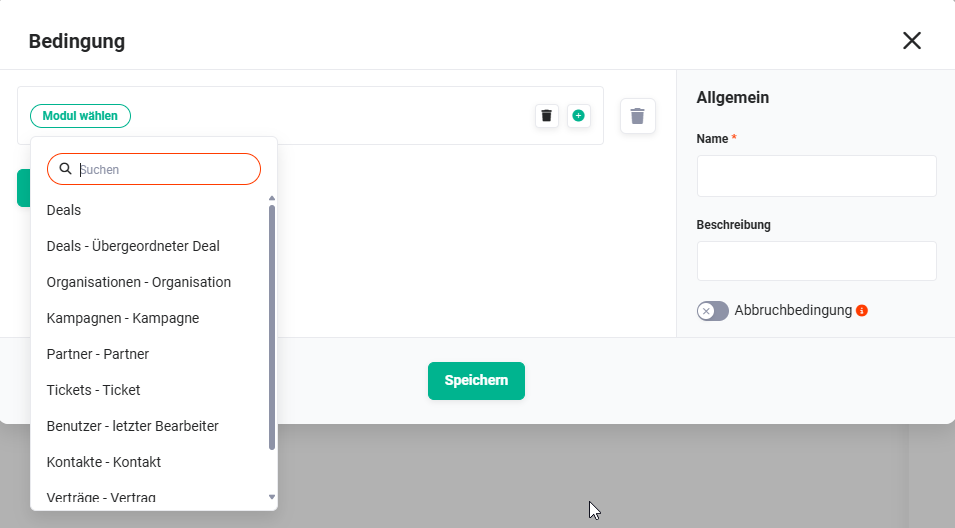 Condition popup - Select module
Only modules that are already linked in the automation via a configured trigger are available for selection. Since conditions are always bound to a trigger, only the modules defined there are offered - a condition can only be checked against their records and fields.
1.3. Condition Step 3 - Select field
After selecting the module, the "Select field" action button is displayed. After clicking the "Select field" action button, a flyout menu with the fields from the selected module is displayed to select the field the condition applies to.
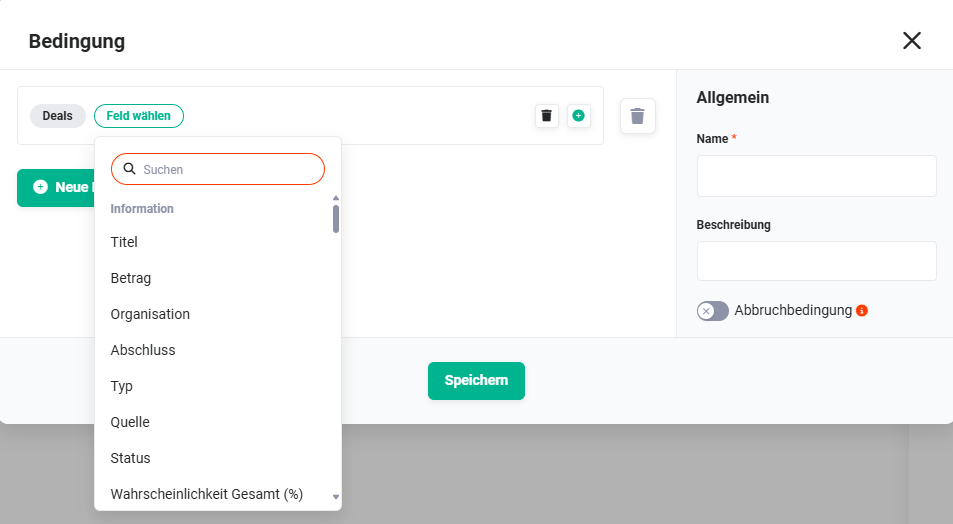 Condition popup - Select field
1.4. Condition Step 4 - Select comparison
After selecting the field, the "Select comparison" action button is displayed. After clicking the "Select comparison" action button, a flyout menu with the possible types of comparison is displayed.
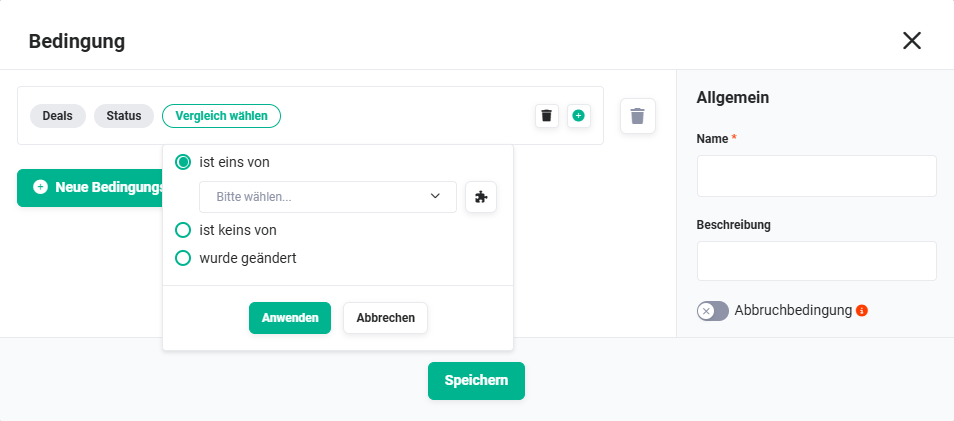 Condition popup - Select comparison
The type of comparison (comparison operator) depends on the field type of the selected field!
The comparison operators are always specified by the system itself - depending on the field type!
The available comparison operators depend not only on the field type of the selected field, but also on the linked trigger. The comparison operator "was changed" is not available in conditions that are linked to the "Record created" trigger, because at the time of triggering there is no previous state of the record with which a comparison would be possible.
The following comparison operators are available as examples:
- Text/text area
- is
- is not
- begins with
- ends with
- contains
- does not contain
- less than
- greater than
- less than or equal
- greater than or equal
- was changed
- Picklist/multi-picklist
- is one of
- is none of
- was changed
- Number/currency/percent
- is not
- less than
- greater than
- less than or equal
- greater than or equal
- was changed
- Email/URL
- is
- is not
- begins with
- ends with
- contains
- does not contain
In the "Select comparison" flyout menu, the "Configure workspace" action icon (icon "puzzle") is available in the row of the selected comparison (comparison operator).
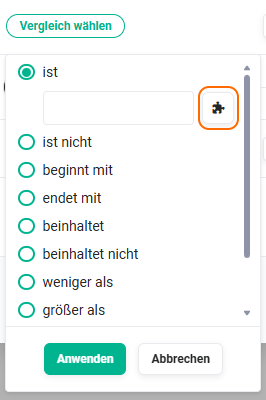 "Select comparison" flyout menu - "Configure workspace" action icon
A corresponding value can be entered directly in the input field of the comparison operator.
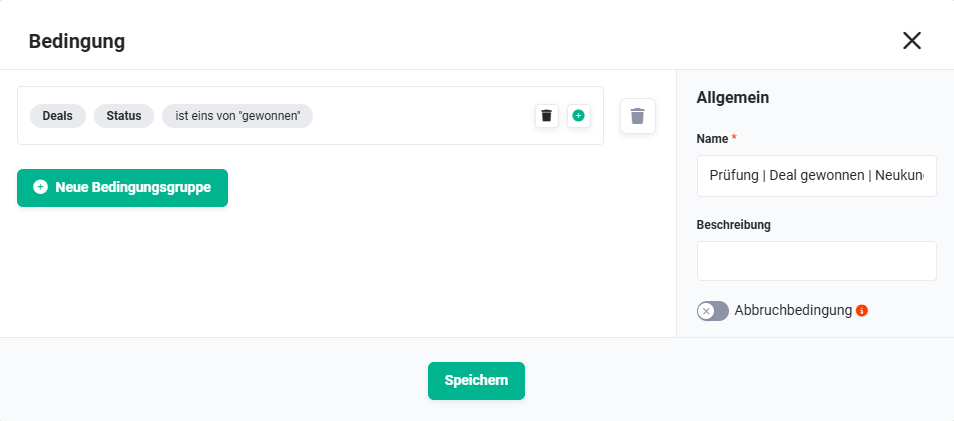 Condition popup - Example configuration of a simple condition
1.5. Condition Step 4a - Configure workspace (optional)
Optionally, the "Configure workspace" function can also be used to configure more complex comparisons.
After clicking the "Configure workspace" action icon (icon "puzzle"), the "Set value" popup opens.
The functionalities in the "Set value" popup are described in detail in the section Configure workspace - Set value.
1.6. Condition Step 4b - Additional condition (optional)
Three action icons are displayed in the row of a condition:
- Delete (icon "small recycle bin") → the row of the condition is deleted
- Insert new condition after this row (icon "plus") → A new condition (row) is inserted after this row.
Conditions are linked with the logical operator "and" or "or". - Delete condition group (icon "large recycle bin") → the entire condition group (which can contain several conditions) is deleted
 Single row of a condition
1.7. Condition Step 4c - New condition group (optional)
After clicking the "New condition group" button, a further condition group is displayed, within which one or more further conditions can be inserted.
Condition groups are linked with the logical operator "and" or "or".
1.8. Condition Step 5 - Save condition
After clicking the "Save" button in the "Condition" popup, the condition is saved and displayed in the editor.
1.9. Delete condition
By selecting a condition (by clicking it, the frame is shown thick) and pressing the "Del key", a condition can be deleted again in the automation editor.
If the condition is connected to other configured nodes, a popup with the text "Do you want to create direct connections between triggers and actions?" is displayed. If no direct connection is created (button "Cancel"), a further popup with the text "Do you really want to delete this node? Subsequent nodes may be reset as a result if they lose the module binding of a trigger." is displayed.
1.10. Multiple triggers and order
An automation can contain several conditions and actions that are linked to one or more triggers. The order of processing plays an important role here.
Order of conditions
If several conditions are assigned to a trigger, they are processed in the defined order from top to bottom. The order can be adjusted individually in the trigger sidebar under Connections by drag & drop.
An automation checks both the lead status and the industry of a lead. If the lead status is deemed more important, the corresponding condition should be placed first - it is then checked first and a classification is made. The industry conditions only follow afterwards.
Cancellation condition
If a condition is marked as a cancellation condition, all subsequent conditions are no longer checked as soon as this condition applies and the associated action has been executed.
The cancellation condition is only useful if subsequent conditions are no longer relevant when a match occurs. If several independent conditions should always be checked, no cancellation condition may be set.
Order of triggers
In automations with several triggers, the order of the triggers themselves can also be defined. The order determines which trigger is processed first and can likewise be adjusted in the sidebar by drag & drop.
Activation after creation
Newly created and saved automations are inactive by default. They must be activated manually after configuration has been completed. This ensures that an incompletely configured automation is not executed unintentionally.
2. Practical examples
1 – Simple status check: Only process won deals further
An automation is intended to automatically create a sales order when a deal is saved – but only if the deal has the status won. As a condition, the Status field from the Deals module is configured with the comparison operator is one of and the value won. Records with other status values do not pass the condition and do not trigger a subsequent action.
2 – AND link: Only notify new customers with a specific package
A notification should only be triggered if a newly created contact is at the same time of type New customer and the Package field has the value Enterprise. Both criteria are configured as separate condition rows within the same condition group and are automatically linked with AND.
3 – OR link with condition groups: Two paths to the same result
An email should be sent both for the status in progress and for the status escalated. To do this, two condition groups are created – each contains its own status check. The groups are linked with the operator OR, so that the action is executed when either of the two conditions applies.
4 – Cancellation condition: Set letter salutation based on salutation, only execute first match
An automation checks in turn whether the salutation is Mr, Mrs or --none--, and sets an appropriate letter salutation in each case. Since only exactly one condition can ever apply, all conditions except the last are marked as cancellation conditions. As soon as a condition applies and the associated action has been executed, the remaining conditions are no longer checked – this saves system resources and prevents contradictory actions.
3. Frequently asked questions
Why can't I configure a condition even though it has been created in the editor?
A condition can only be configured if it is connected to an already configured trigger. If no trigger is linked or if it has not yet been saved, the condition configuration remains locked.
Which modules are available for selection when configuring a condition?
Only modules that are already linked in the automation via a configured trigger. Since conditions are always bound to a trigger, only the modules defined there and their fields can be checked.
When do I use several condition rows within a group, and when several condition groups?
Several rows within a group are linked with AND – all conditions must apply at the same time. Several groups are linked with OR – it is sufficient for one group to apply in full. For "A and B" a group with two rows is sufficient; for "A or B" two separate groups are needed.
When is a cancellation condition useful?
If several conditions are configured for a trigger and only a maximum of one of them can ever apply, a cancellation condition is worthwhile: as soon as one condition applies, the subsequent ones are no longer checked. If, on the other hand, several independent conditions should always be checked, no cancellation condition may be set. Note: cancellation conditions are not useful if time-delayed actions follow.
Can I always use the comparison operator "was changed"?
No. The operator was changed is only available in conditions that are linked to the Record changed or Record saved trigger (for updates). With Record created there is no previous state, so this operator is not available there.