
DATEV Buchungsdatenservice
Package: BILLING
1. General
The DATEV integration allows invoices and accounting records to be sent to DATEV Unternehmen Online automatically. This saves you valuable time, reduces costs and minimises errors.
The DATEV interface in brainX is based on the internet-based platform DATEV Unternehmen online.
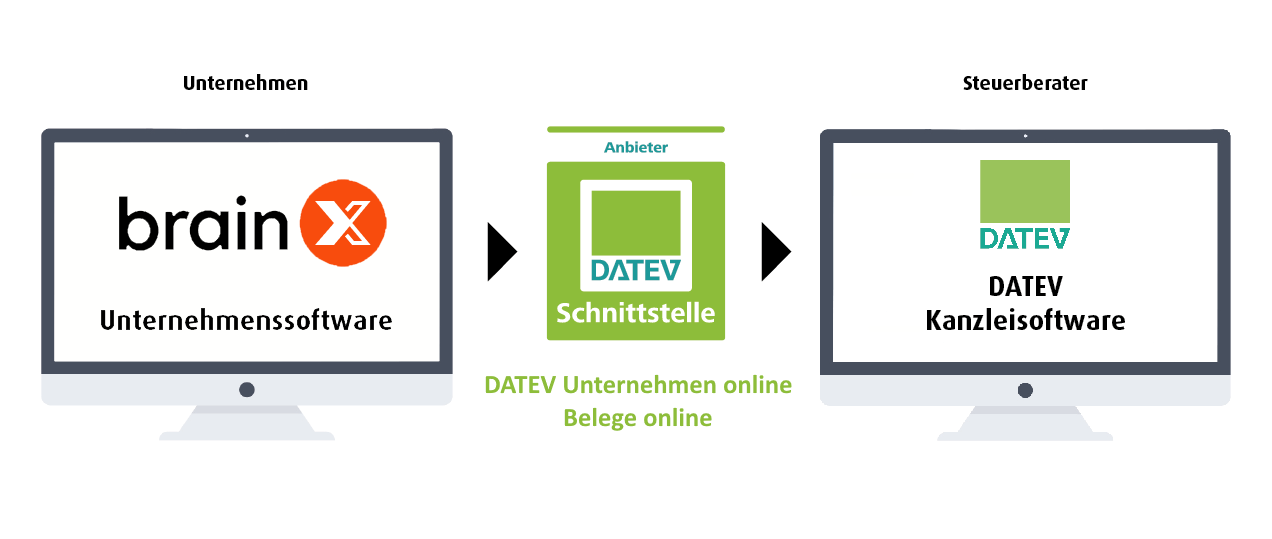 Schema of the DATEV interface
To register or log in to “DATEV Unternehmen online”, the browsers “Google Chrome” or “Microsoft Edge” are recommended (see also the DATEV help pages Recommended browsers for DATEV Unternehmen online and Browsers and DATEV programs). The interface in brainX itself is cross-platform and not browser-dependent.
Furthermore, a suitable login procedure (DATEV SmartLogin, DATEV SmartCard or DATEV mIDentity) from DATEV is required in order to register or log in to “DATEV Unternehmen online”.
An export of Invoices, Incoming Invoices, Cancellations and Credits from brainX can be carried out with any supported browser of brainX, regardless of the operating system used!
1.1. DATEV Rechnungsdatenservice 1.0 vs. DATEV Buchungsdatenservice
In principle, two integrations are available:
- DATEV Rechnungsdatenservice 1.0 → transfers documents and generates posting proposals (provided general ledger accounts are configured)
- DATEV Buchungsdatenservice → transfers complete accounting records/batches and the master data of the creditors/debtors
Graphical representation of the different processes:
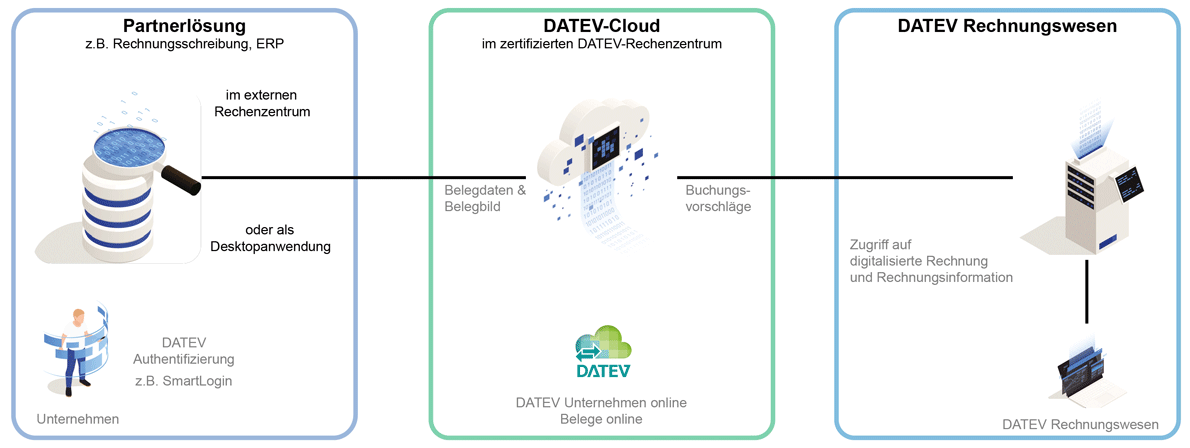 Process diagram DATEV Rechnungsdatenservice 1.0
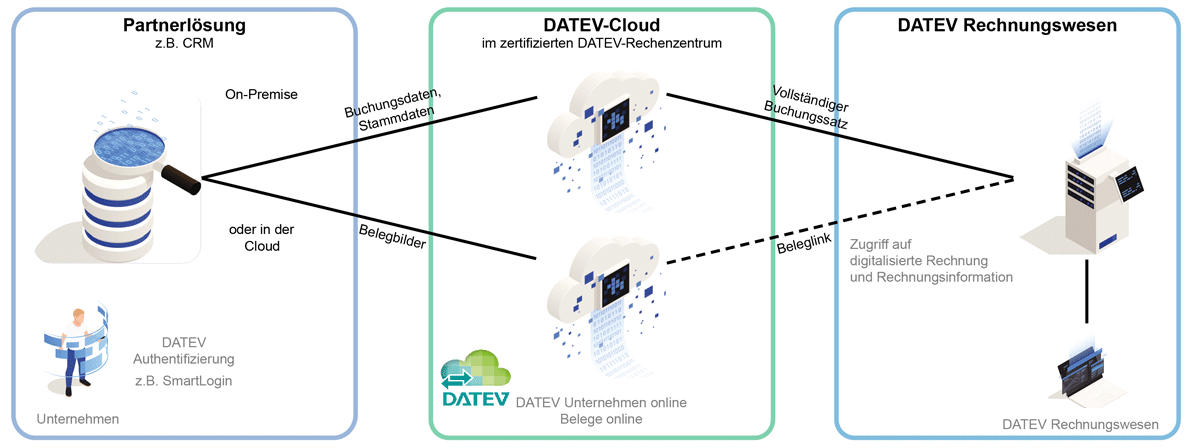 Process diagram DATEV Buchungsdatenservice
The advantage clearly lies with the DATEV Buchungsdatenservice: once the data has been carefully entered into brainX at the beginning, the accounting is also faster at the end. Accounting records are transferred to DATEV in full. This means less work in your own accounting department, or in an external tax firm, and the company benefits from enormous cost savings.
However, the export procedure within brainX is more or less identical for both integrations: in the list view of the Invoices, Incoming Invoices, Cancellations and Credits modules, selected records can be exported using actions, which differ, however, depending on the integration used:
| DATEV Rechnungsdatenservice 1.0 | DATEV Buchungsdatenservice | |
|---|---|---|
| Actions |
|
|
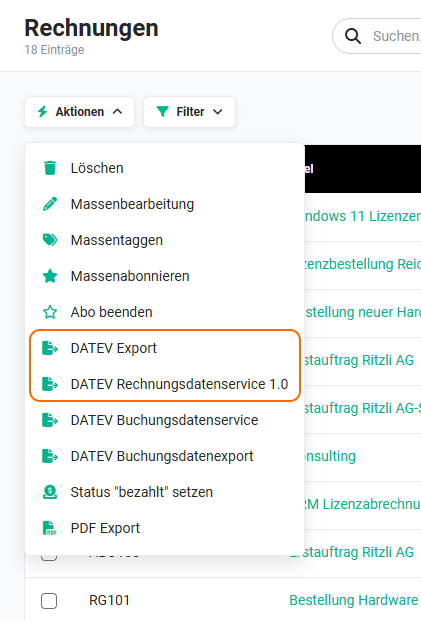 Invoices module - Rechnungsdatenservice actions
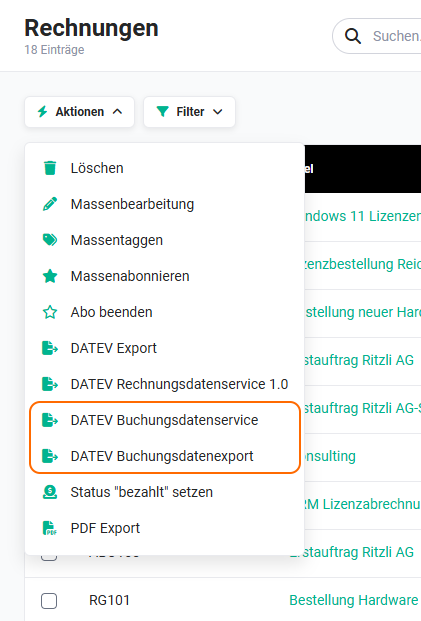 Invoices module - Buchungsdatenservice actions
2. DATEV Buchungsdatenservice
2.1. Activation
To use the DATEV Rechnungsdatenservice, an organization is required on the DATEV Unternehmen online platform.
On the brainX side, no special activation of the DATEV Buchungsdatenservice is necessary if the brainX package “Billing” has been booked.
If the Deferred Income accounting is to be used in addition to the DATEV Buchungsdatenservice, this must be activated explicitly (see section Deferred Income accounting - Activation).
2.2. Global settings
After opening the setting item “DATEV Rechnungsdatenservice 1.0” in the company information, it appears as follows:
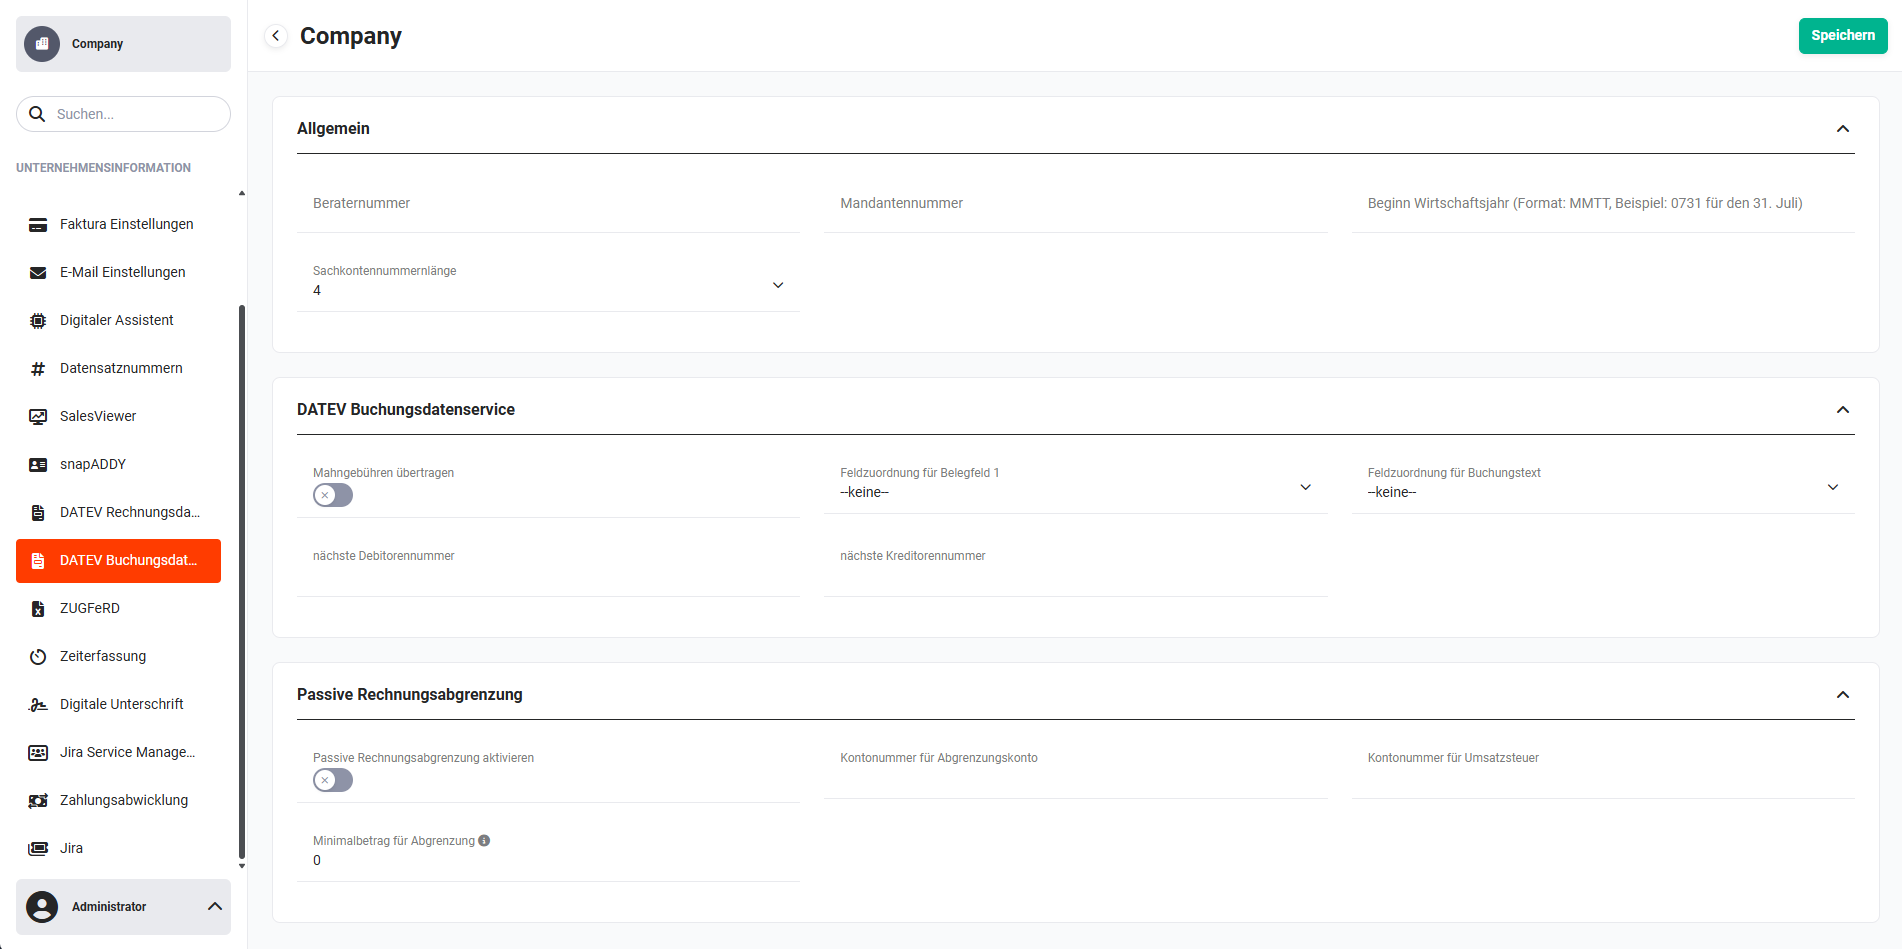 Global settings - company information - DATEV Buchungsdatenservice
2.2.1. DATEV Buchungsdatenservice settings
After opening the setting item “DATEV Buchungsdatenservice” in the company information, the following blocks/fields are displayed:
- General
- Consultant number → input field for the consultant number
- Client number → input field for the client number
- Start of financial year → date field for entering the financial year in the format: MMDD, example: 0731 for 31 July
- General ledger account number length → picklist with numeric values for defining the general ledger account number length
- DATEV Buchungsdatenservice
- Transfer dunning fees → toggle for the setting whether dunning fees are transferred
- Field assignment for document field 1 → picklist for the field assignment of document field 1
- Field assignment for posting text → picklist for the field assignment of the posting text
- next debtor number → input field for the next debtor number
- Assign debtor numbers for Contacts → toggle to activate the automatic assignment of the next debtor number (field “next debtor number”) also for records in the Contacts module. If no debtor number has yet been stored for an invoice linked to a contact, it is assigned automatically upon export – analogous to the existing behaviour in the Organizations module.
- next creditor number → input field for the next creditor number
- Deferred Income accounting
- Activate Deferred Income accounting → toggle to activate deferred income accounting
- Account number for accrual account → input field for the account number of the accrual account (in medium-sized companies usually account number 3900)
- Account number for VAT → input field for the account number of VAT (in medium-sized companies usually account number 3800)
- Minimum amount for accrual → input field for the minimum amount for the accrual (under § 5 (5) sentence 2 of the German Income Tax Act (EStG), a deferred or accrued item does not have to be created if the individual expense or income does not exceed the amount of 800 euros)
2.2.2. Visibility of the list view action
For the “DATEV Buchungsdatenservice” integration there are essentially two actions in the list view in the Billing modules:
Since usually only one of the actions is used/needed in the list views, it is advisable to hide the action that is not needed using the permission settings, or to completely deactivate the actions for users who are not supposed to perform a DATEV export.
2.3. User settings
Every user who wishes to use the “DATEV Buchungsdatenservice” action requires a personal access key for the DATEV login! No personal access key is required for the “DATEV Export” action.
This access key can be created in My Preferences - Integrations.
After clicking the “DATEV” tile, the “Access key management (token)” popup opens.
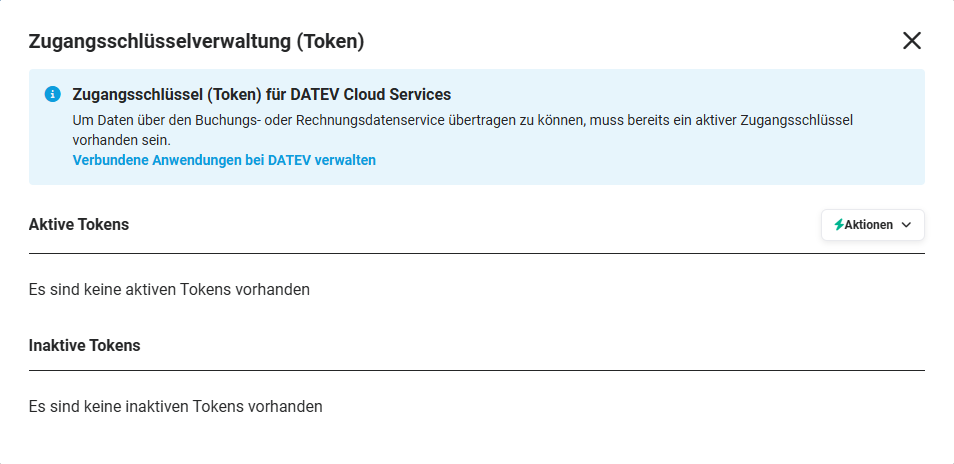 Access key management (token) popup
The “Access key management (token)” popup is divided into the following areas:
- Access key (token) for DATEV Cloud Services → link “Manage connected applications at DATEV” for the DATEV login
- Active tokens → display of the active tokens
- Inactive tokens → display of the inactive tokens
- “Actions” button → opens a flyout menu to request a new access key:
- Short-term token (11 hours)
- Long-term token (2 years)
Access key management is organization-capable. This means requested tokens are each valid only for one organization.
2.3.1. Request a new access key
After clicking the “Actions” button, a flyout menu opens in which either a short-term token (validity 11 hours) or a long-term token (validity 2 years) can be requested.
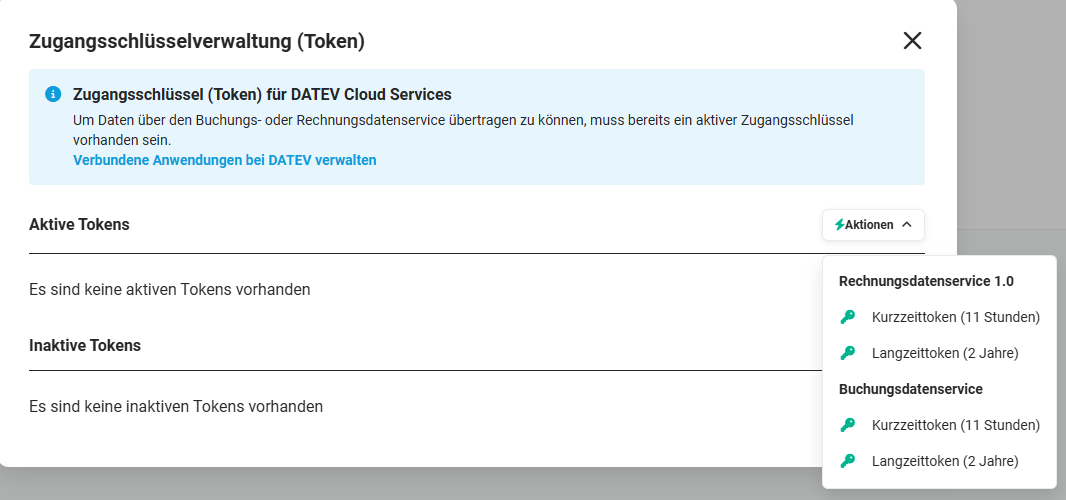 Access key management (token) popup - Actions button
To support multiple organizations, the “Master data” popup opens before requesting a long-term token to verify the consultant and client number, which are already pre-filled by the system.
2.3.2. Manage connected applications at DATEV
After clicking the “Manage connected applications at DATEV” link, the login page for the DATEV login opens in a new browser tab.
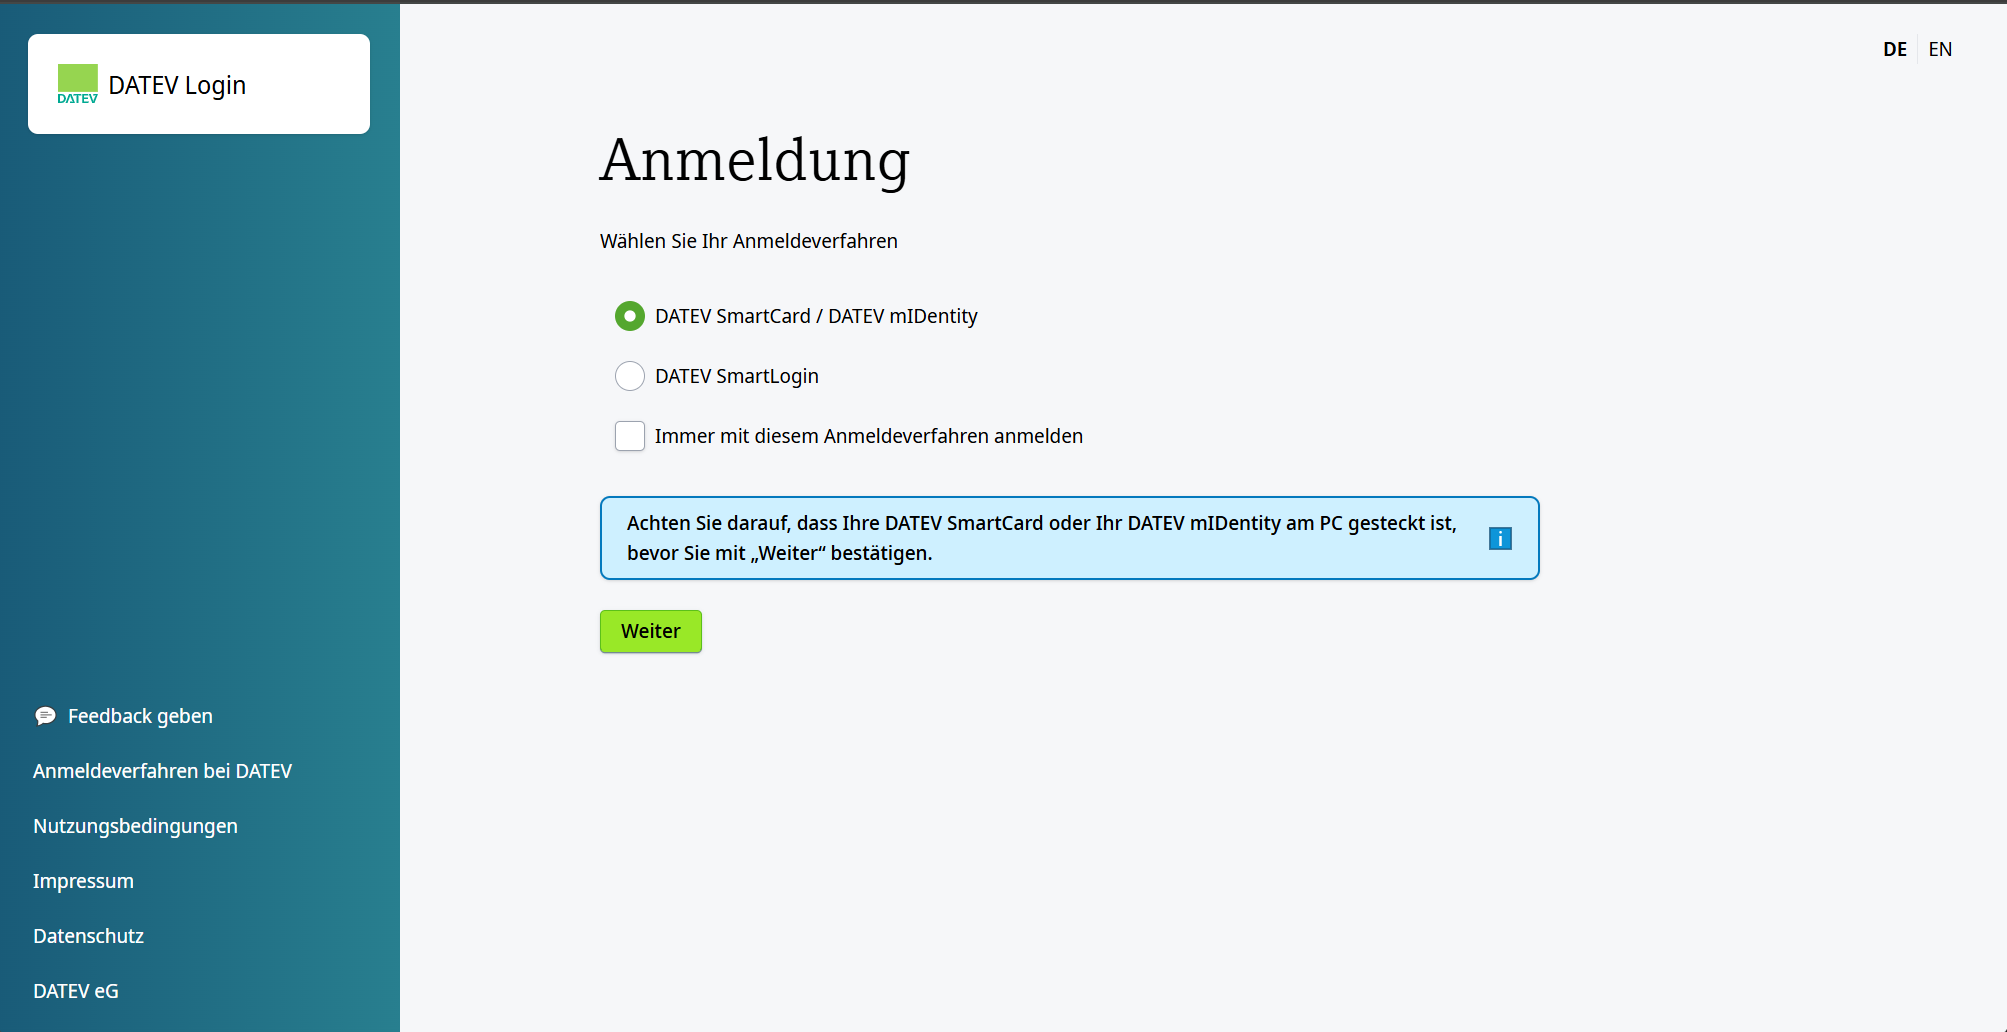 DATEV login - registration
Two login procedures are available for selection here:
-
DATEV SmartCard / DATEV mIDentity
DATEV SmartCard / DATEV mIDentity enables secure access to the applications of the DATEV data centre. The DATEV SmartCard is inserted, for example, into the DATEV mIDentity stick card reader. Use is possible with the DATEV security package on a Windows PC.
The Microsoft “Edge” browser or “Google Chrome” on a Windows PC is required here in order to log in to DATEV Unternehmen online. A USB stick provided by DATEV serves as the “smartcard” here.
For detailed information on the DATEV SmartCard, see the DATEV online help.
-
DATEV SmartLogin
DATEV SmartLogin is an authentication procedure for online applications using a smartphone app (smartphone or tablet with a Google Android or Apple iOS operating system) using a QR code.
Note: Please note that only one person can be authenticated at a time using the smartphone app.
For detailed information on DATEV SmartLogin, see the DATEV online help SmartLogin.
After selecting the login type and clicking the “Next” button, the required permissions still have to be granted to the “brainX Datenservice” application.
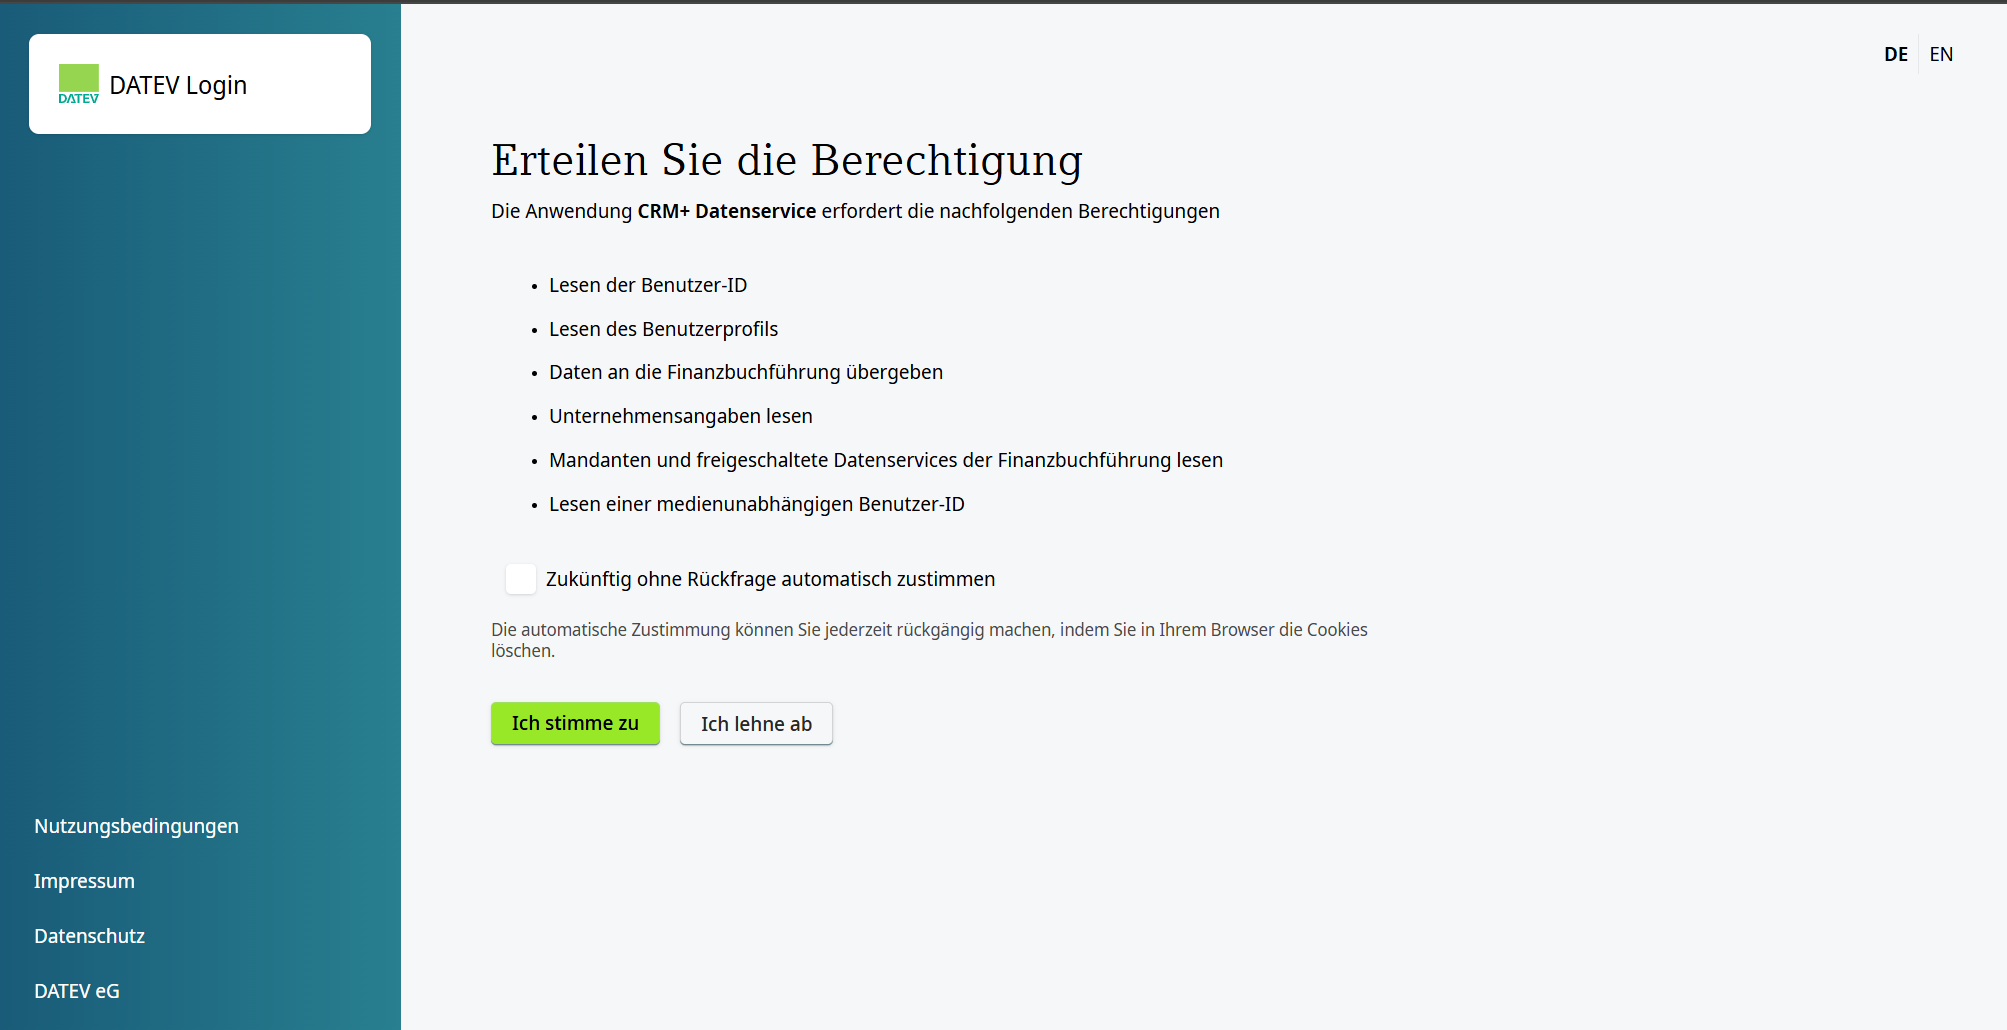 DATEV login - grant permission
After requesting a token - regardless of whether “short-term token (11 hours)” or “long-term token (2 years)” - the token is displayed after a check in the “Access key management (token)” popup in the “Active tokens” block.
If the check for requesting a token fails, an error message with a corresponding note on the cause is displayed.
2.3.3. Display of active/inactive tokens
In the “Access key management (token)” popup all active/inactive tokens are listed.
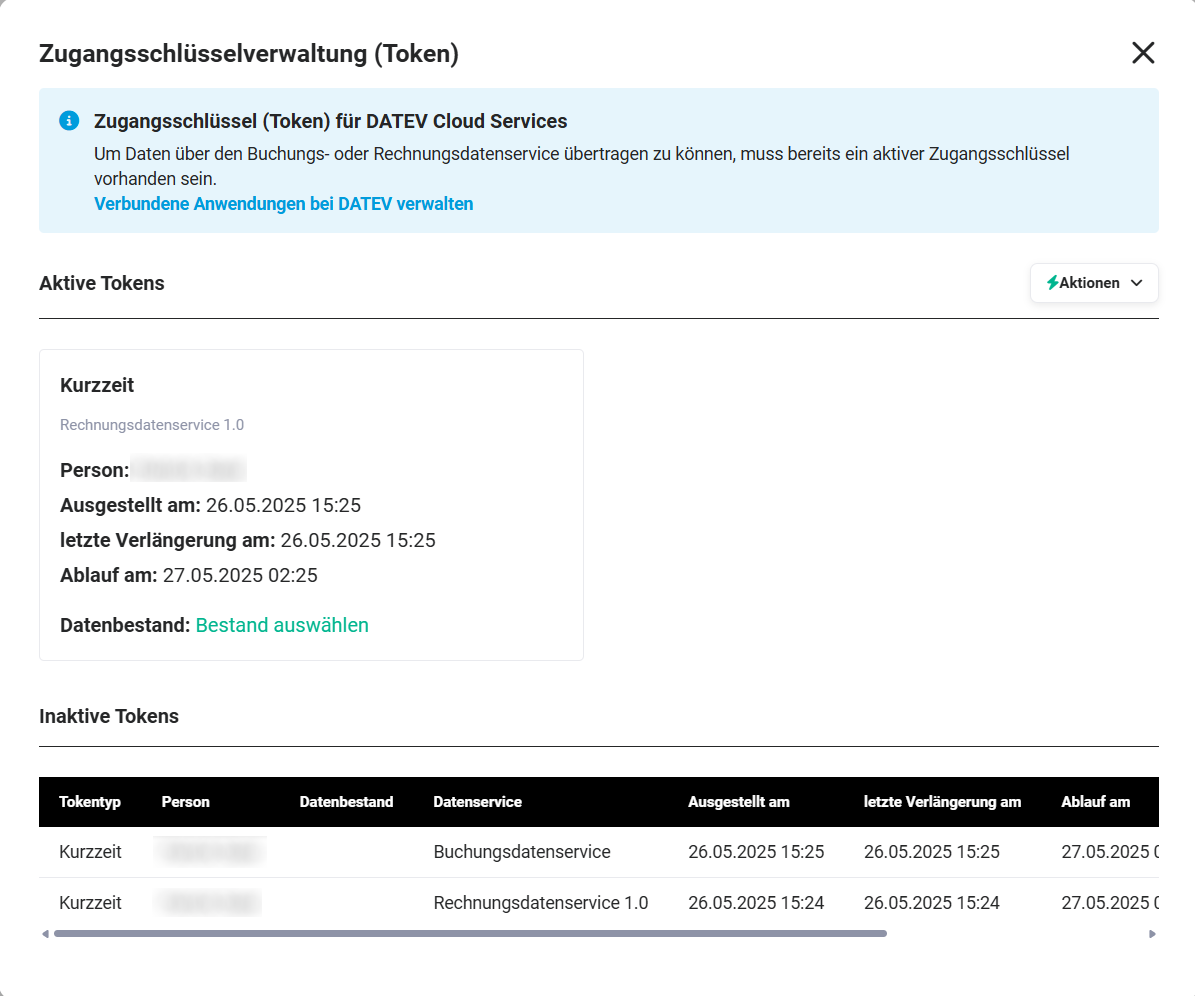 Access key management (token) popup - active/inactive tokens
2.3.3.1. Active tokens
An active token is displayed in a tile showing the following information:
- Person → first and last name of the person to whom the DATEV access medium (SmartLogin or SmartCard) is registered
- Issued on → date and time the token was issued
- last renewal on → date and time of the token renewal. Technically, the tokens only have a runtime of 15 minutes and are therefore automatically renewed regularly. The tokens can be renewed up to the general validity period at the maximum (short-term token 11 hours, long-term token 2 years).
- Expiry on → date and time when the token loses its validity
- Data set → display of the data set for which the token is valid. Displayed here is either the consultant and client number (for a long-term token) or the action link Select data set (for a short-term token). If a data set has already been selected, the data set is also displayed here including icons for editing and deleting.
2.3.3.2. Inactive tokens
The overview table shows the following columns:
- Token type → display of which token type it is: short-term token or long-term token
- Person → first and last name of the person to whom the DATEV access medium (SmartLogin or SmartCard) is registered
- Data set → display of the data set for which the token is valid. Displayed here is the consultant and client number (for a long-term token). If a data set has already been selected, the data set is also displayed here including icons for editing and deleting.
- Data service → display of the data service used (DATEV Rechnungsdatenservice 1.0 or DATEV Buchungsdatenservice)
- Issued on → date and time the token was issued
- last renewal on → date and time of the token renewal. Technically, the tokens only have a runtime of 15 minutes and are therefore automatically renewed regularly. The tokens can be renewed up to the general validity period at the maximum (short-term token 11 hours, long-term token 2 years).
- Expiry on → date and time when the token loses its validity
- Access key revoked → date and time when the token was revoked, see section Revoke access key
- Tokens are stored encrypted in the brainX database
- inactive tokens are deleted from the brainX database
- only one token can exist per user and data service (DATEV Rechnungsdatenservice 1.0 and DATEV Buchungsdatenservice)
- if a long-term token exists, the long-term token is deleted when a short-term token is requested
2.3.3.3. “Select data set” action
The “Select data set” action link is generally only available for a short-term token! Long-term tokens are generally bound to a data set and must be requested anew if the data set is changed.
After clicking the action link, the “Master data” popup opens to verify the consultant and client number, which are already pre-filled by the system.
Should the consultant and client number not be correct, an organization can be selected using the “Select from list” button. Another “Master data” popup opens here, in which the consultant and client number are transferred to the first “Master data” popup by clicking the organization name. After clicking the “Save” button in the first “Master data” popup, this information is saved and displayed in the “Access key management (token)” popup instead of the “Select data set” action link.
If the consultant and client number were not entered correctly during manual input, a corresponding note is displayed.
In this case, the consultant and client number must be checked and corrected accordingly.
2.3.3.4. Revoke access key
Access keys (tokens) lose their validity after a specified time. The validity period depends on the type of token (short-term token or long-term token):
- Short-term token: 11 hours or after a user logout
- Long-term token: 2 years or after requesting a short-term token
For security reasons, the option to manually revoke access keys (tokens) that are still valid (active) has been implemented.
In the “Access key management (token)” popup, the “Revoke access key” action icon (“x” icon) is displayed in the tile of the active token on mouseover.
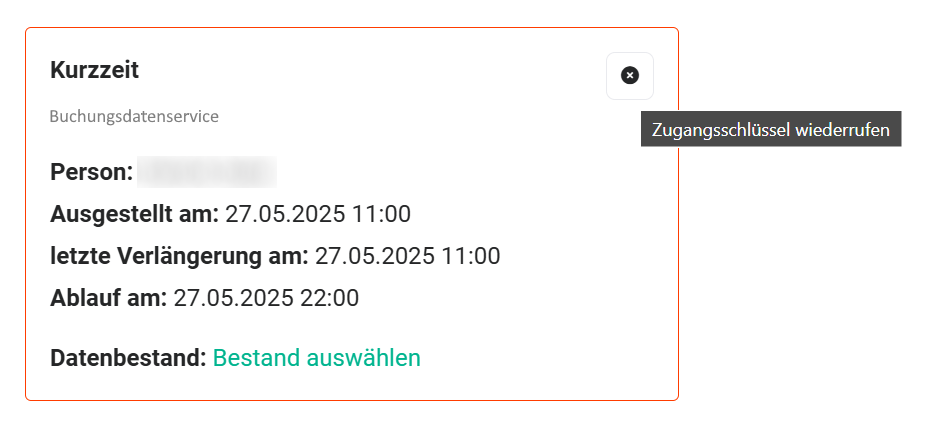 Access key management (token) popup - active tokens - revoke access key
2.4. Module settings
In addition to the standard mandatory fields in brainX, further fields are required for the DATEV Buchungsdatenservice - depending on the respective module.
Standard mandatory fields are each marked with a red star in the editing view of a record and are strictly required in order to be able to save a record.
There are both mandatory fields that are defined as such due to the system, as well as fields that may have been defined as mandatory fields by a corresponding designation in the module management.
2.4.1. Module-specific mandatory fields
For the accounting records it generates, the Buchungsdatenservice requires the following information, which is also transferred to DATEV:
- General ledger account from the product position
- Personal account from Contact/Organization/Vendor (Incoming Invoices)
- Document date (e.g. invoice date for invoices)
- Cost centre (optional)
- Accounting document
The Rechnungsdatenservice used by the DATEV Rechnungsdatenservice 1.0 integration only uses master data (creditors/debtors) already present in DATEV, based on the corresponding number.
The DATEV Buchungsdatenservice integration, however, can actively create and update these in DATEV!
The following information must be stored in the master data of brainX and is transferred to DATEV:
-
Contacts module
- Debtor number
Note: If the option “Assign debtor numbers for Contacts” is activated in the company information, the debtor number is assigned automatically when a value is missing and does not have to be maintained manually. - Contact no.
- Invoice: street
- Invoice: city
- Invoice: postcode
- Invoice: country code
- Tel. direct
- Debtor number
-
Organizations module
- Debtor number
- Organization no.
- Main contact person
- Invoice: street
- Invoice: city
- Invoice: postcode
- Invoice: country code
- VAT ID
- Telephone
- Bank details (of all specified bank accounts)
- Bank name
- IBAN
- BIC
- Bank code
- Account number
-
Vendors module (Incoming Invoices)
- Creditor number
- Vendor no.
- Street
- City
- Postcode
- Country code
- Telephone
- Bank details (only one set of bank details can be created here in brainX, whereas several can be created in the Organizations module)
- Bank name
- IBAN
- BIC
- Bank code
- Account number
The debtor number (Organization) 10000 - 69999 corresponds to the DATEV standard number range for an account length of four digits (= five digits for personal accounts). However, this can be changed in the DATEV software, which is why the field also accepts larger values.
In the Incoming Invoices module, the “Payment method” field (picklist) is available.
In the Vendors module, there is the additional “Creditor number by payment method” block, in which the fields “Payment method” (picklist) and “Creditor number” (numeric field) are present. Depending on the payment method, different creditor numbers can be stored.
2.5. Usage
In the list view of the Invoices, Incoming Invoices, Cancellations and Credits modules, selected records can be exported using actions.
In order to transfer data via the DATEV Buchungsdatenservice, an active access key (short-term or long-term token) must be present.
Should no access key be present before an export, a corresponding message (popup) is displayed.
If the “Confirm” button is clicked in the popup, the “DATEV login” page opens in a new browser tab. After logging in, the browser tab of the DATEV login closes and the list view of the module is displayed again.
2.5.1. Actions in the list view
For the “DATEV Buchungsdatenservice” integration there are essentially two actions in the list view in the Billing modules:
Since usually only one of the actions is used/needed in the list views, it is advisable to hide the action that is not needed using the permission settings, or to completely deactivate the actions for users who are not supposed to perform a DATEV export.
2.5.1.1. DATEV Buchungsdatenservice
The “DATEV Buchungsdatenservice” action transfers data directly to the DATEV data centre. Before the transfer, the data is checked for accuracy and, optionally, a preview of the accounting data to be transferred is displayed.
With “one click”, the data can thus be transferred to DATEV and you receive a notification of the successful transfer.
Step 1 - Selection of the records
The records to be exported are selected in the list view in the corresponding module using a checkbox.
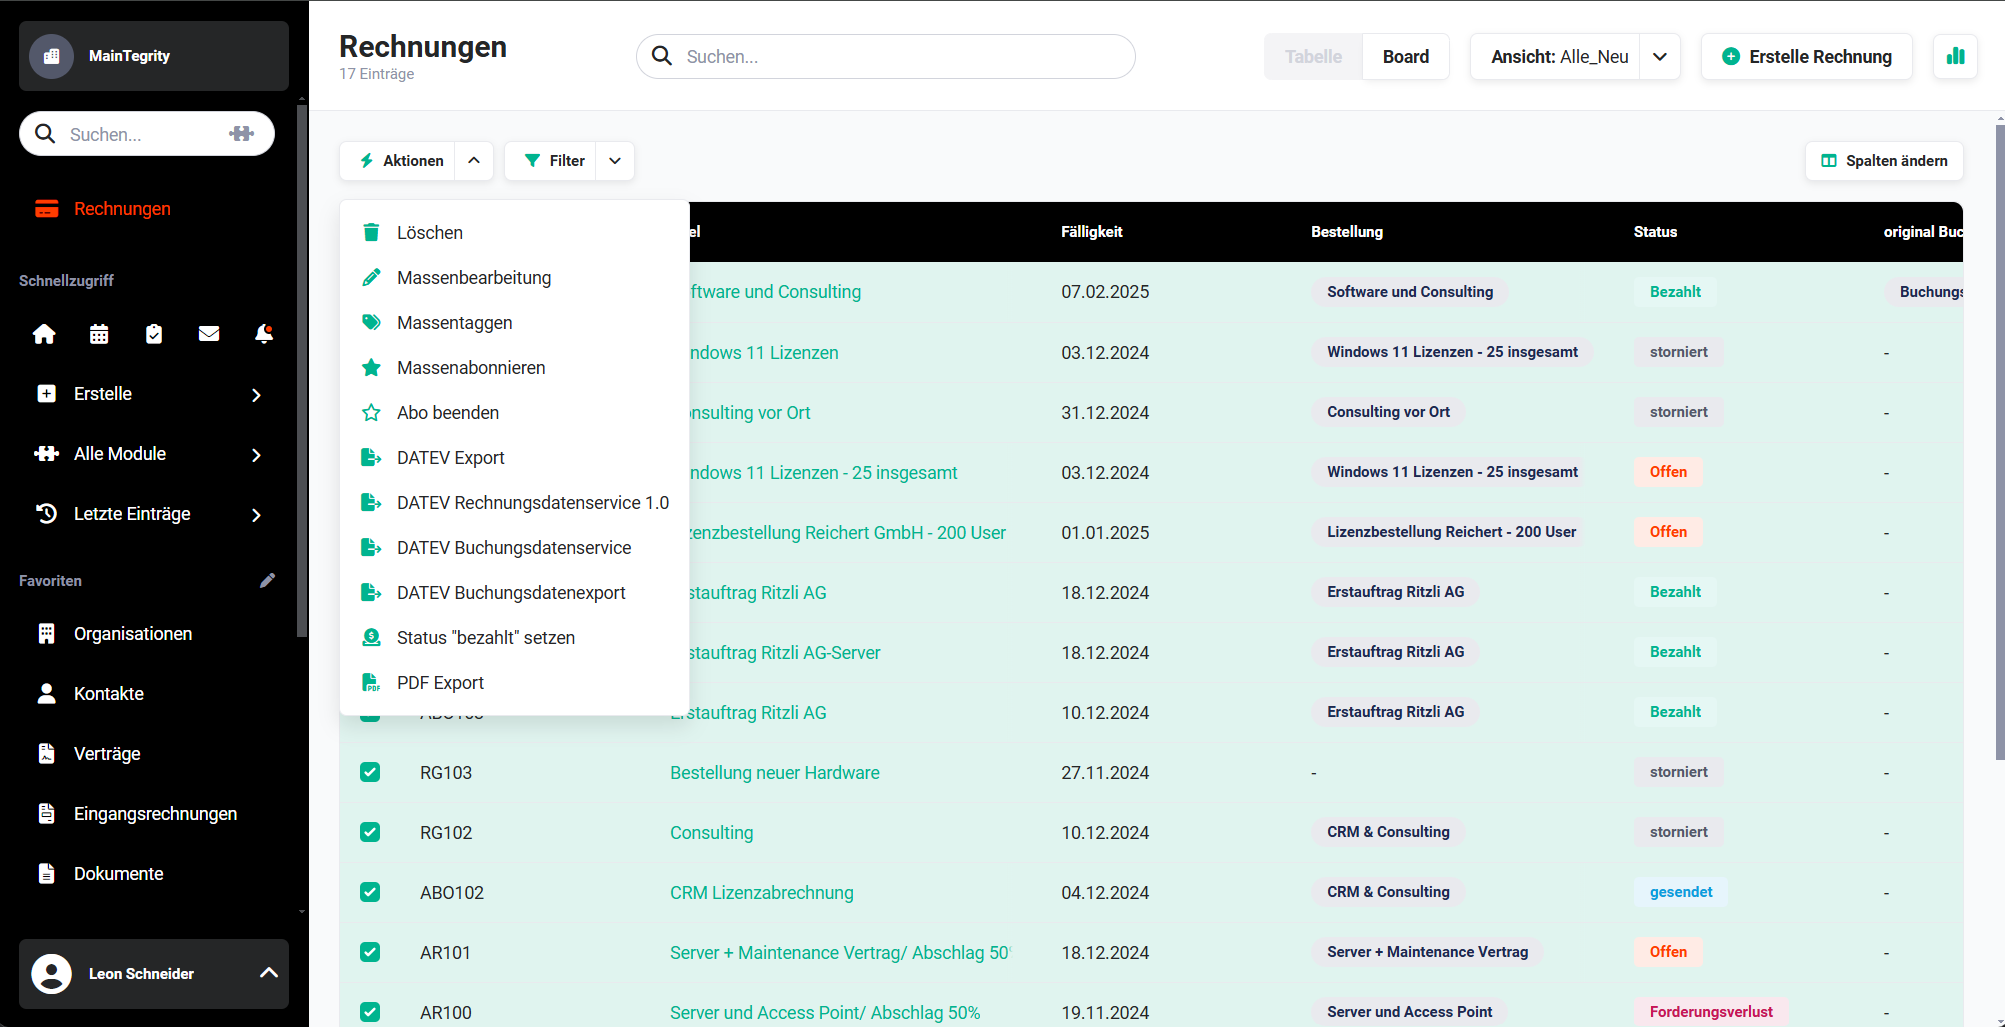 DATEV Buchungsdatenservice - selection of records
Step 2 - Starting the export
After clicking the “DATEV Buchungsdatenservice” action, a popup with the following action buttons is displayed:
- Transfer now → the data is transferred to the DATEV data centre
- Show preview → preview of the records to be transferred
- Cancel → cancels the export process
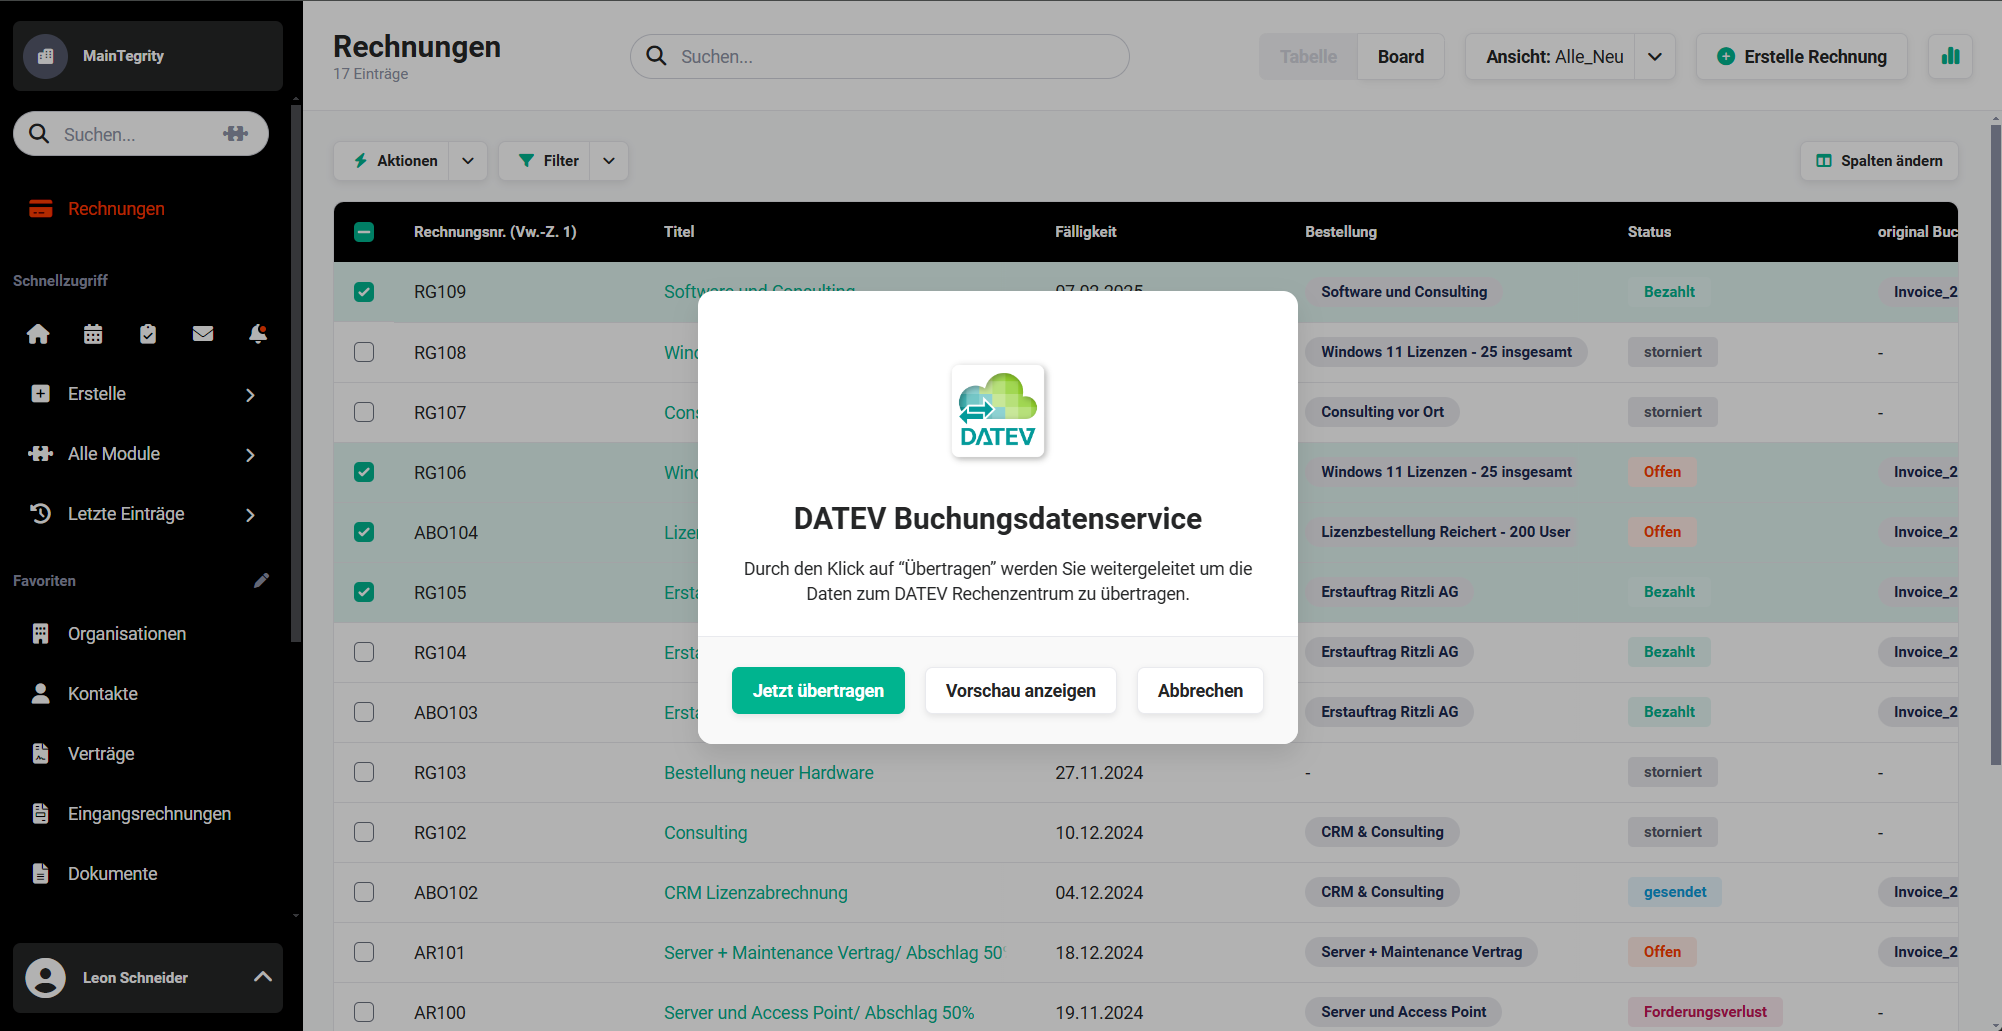 DATEV Buchungsdatenservice - popup before export
Step 2a (optional) - Show preview
After clicking the “Show preview” button, a preview (list view) of the records to be exported is displayed in a separate popup before the export.
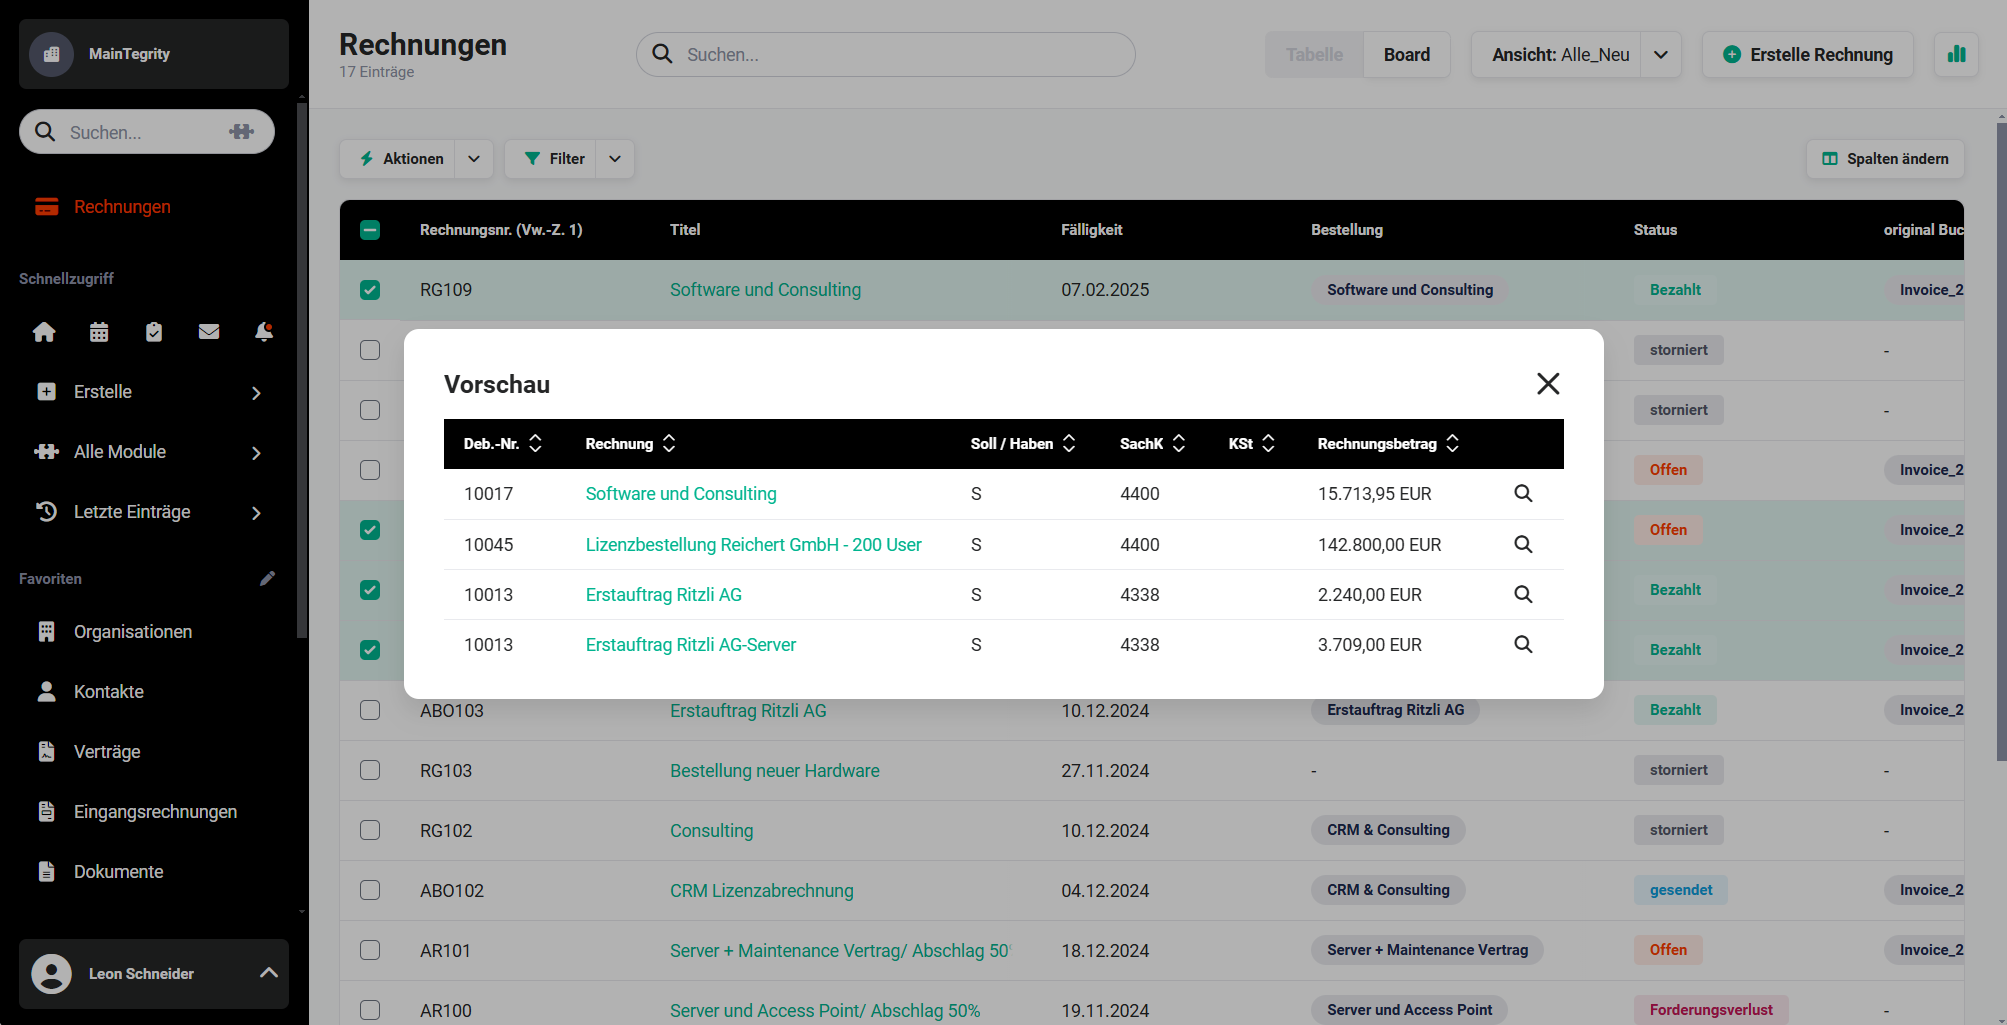 DATEV Buchungsdatenservice - preview popup
Using the “magnifying glass” icon in the list view, the accounting documents can be viewed again if required.
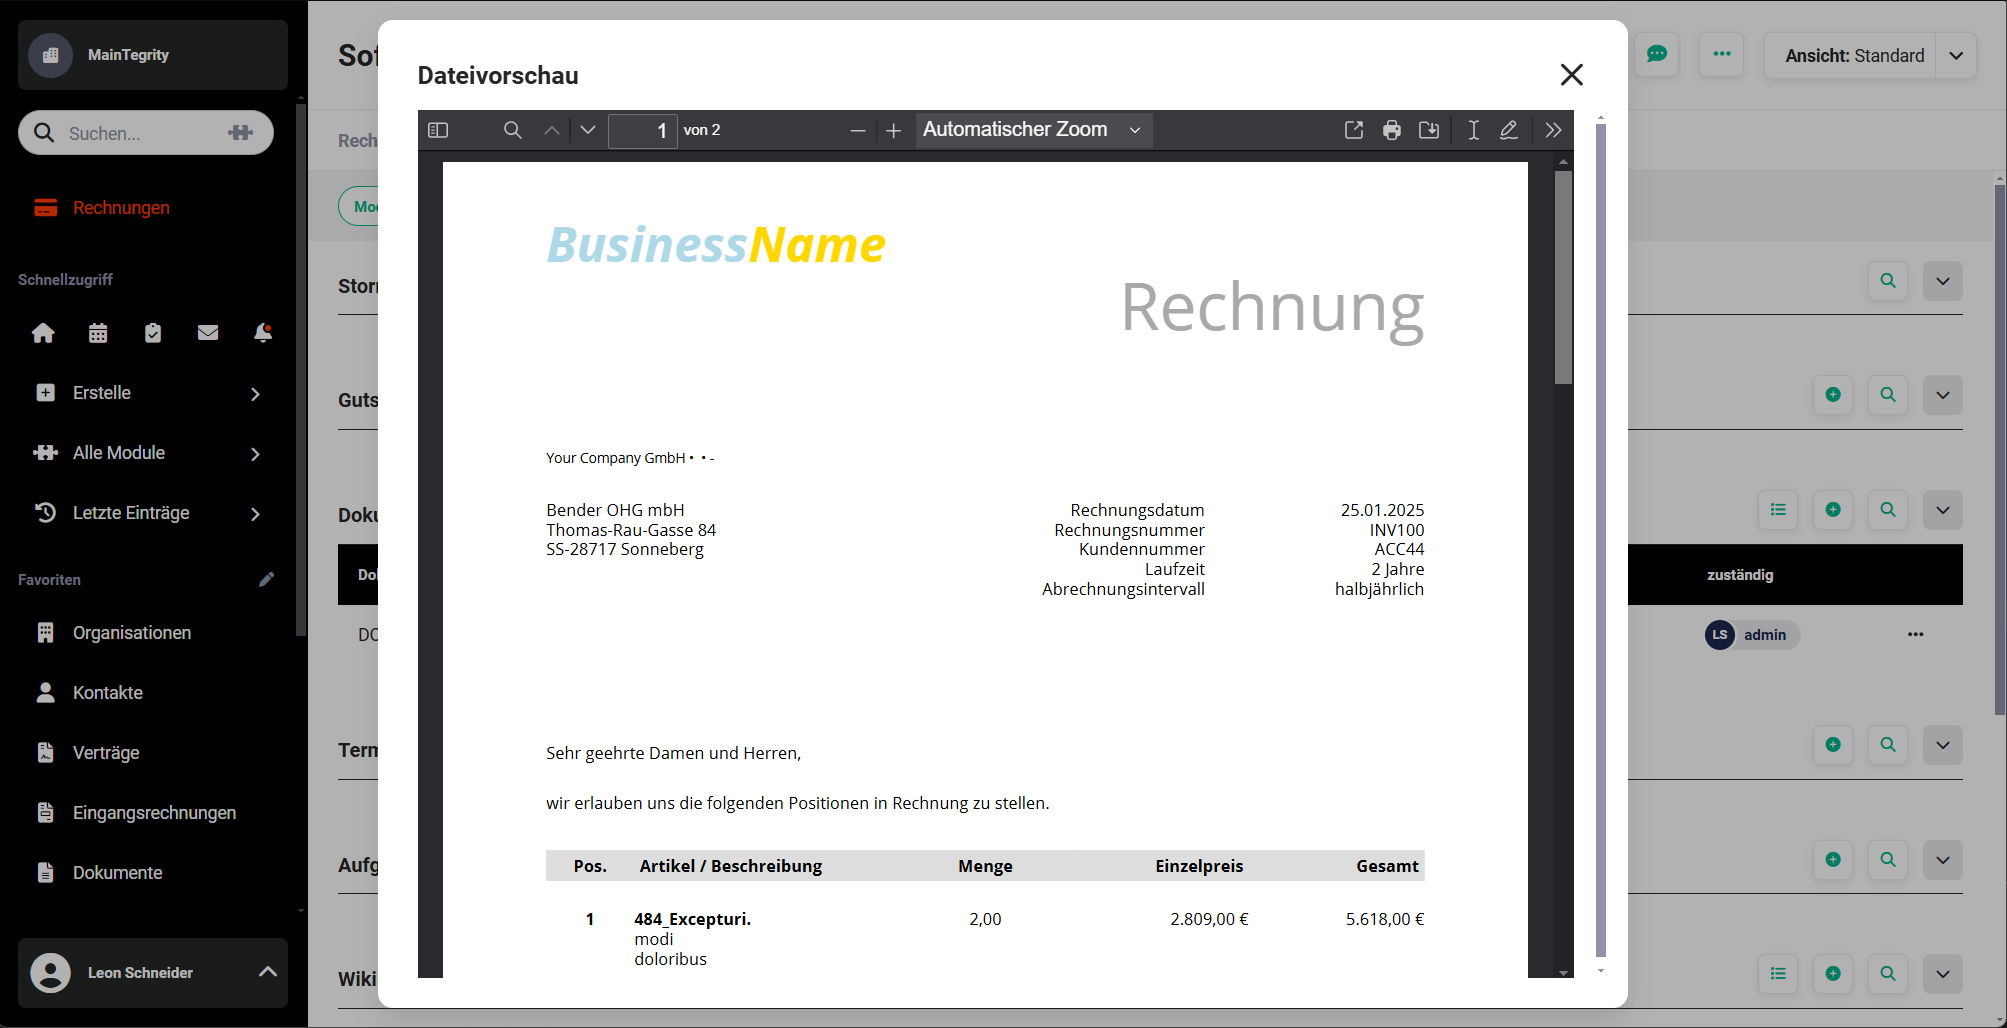 DATEV Buchungsdatenservice - file preview popup
Step 3 - Start export
After the start of the export, the progress of the data transfer is displayed accordingly.
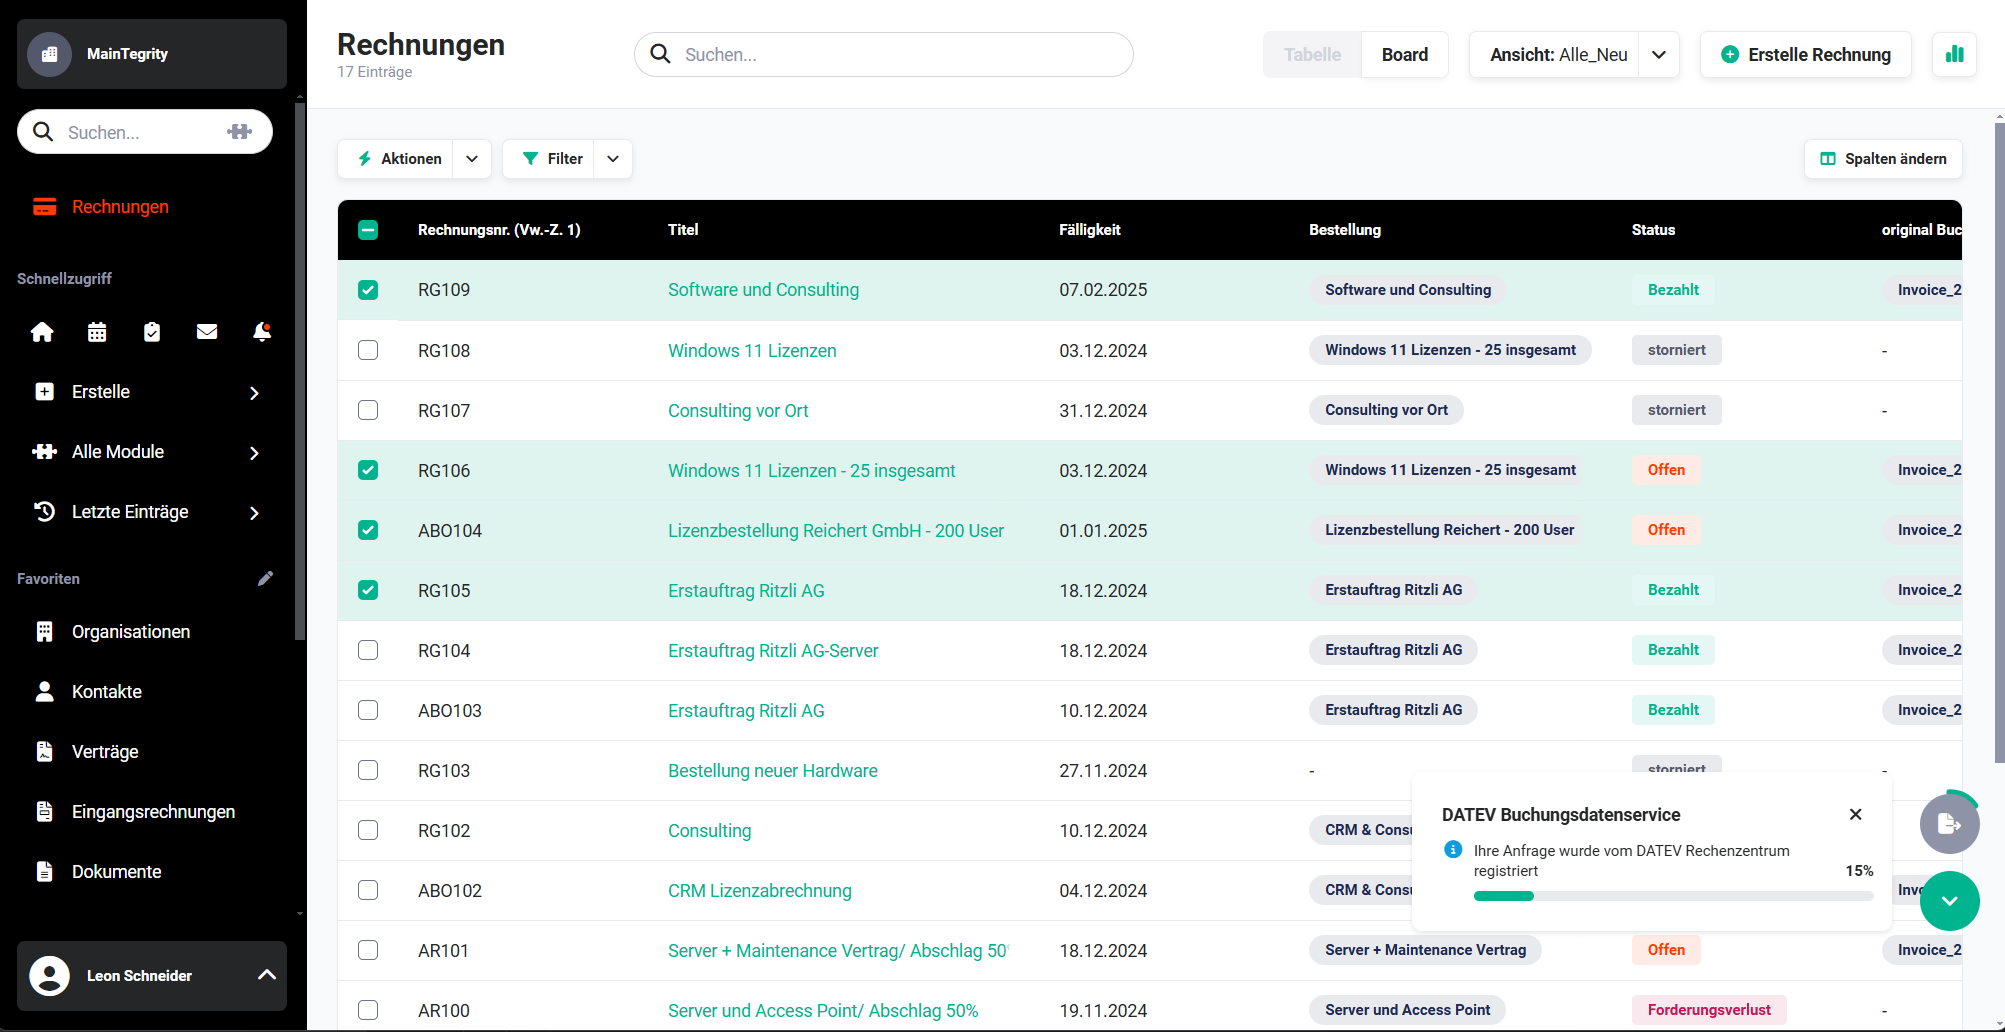 DATEV Buchungsdatenservice - data transfer progress
Depending on the load on the DATEV servers and the volume of records, this step can take from a few minutes to several hours (rare extreme case).
Step 4 - Transfer successful
After the transfer has taken place, confirmation is given that the data has been successfully transferred to the DATEV data centre.
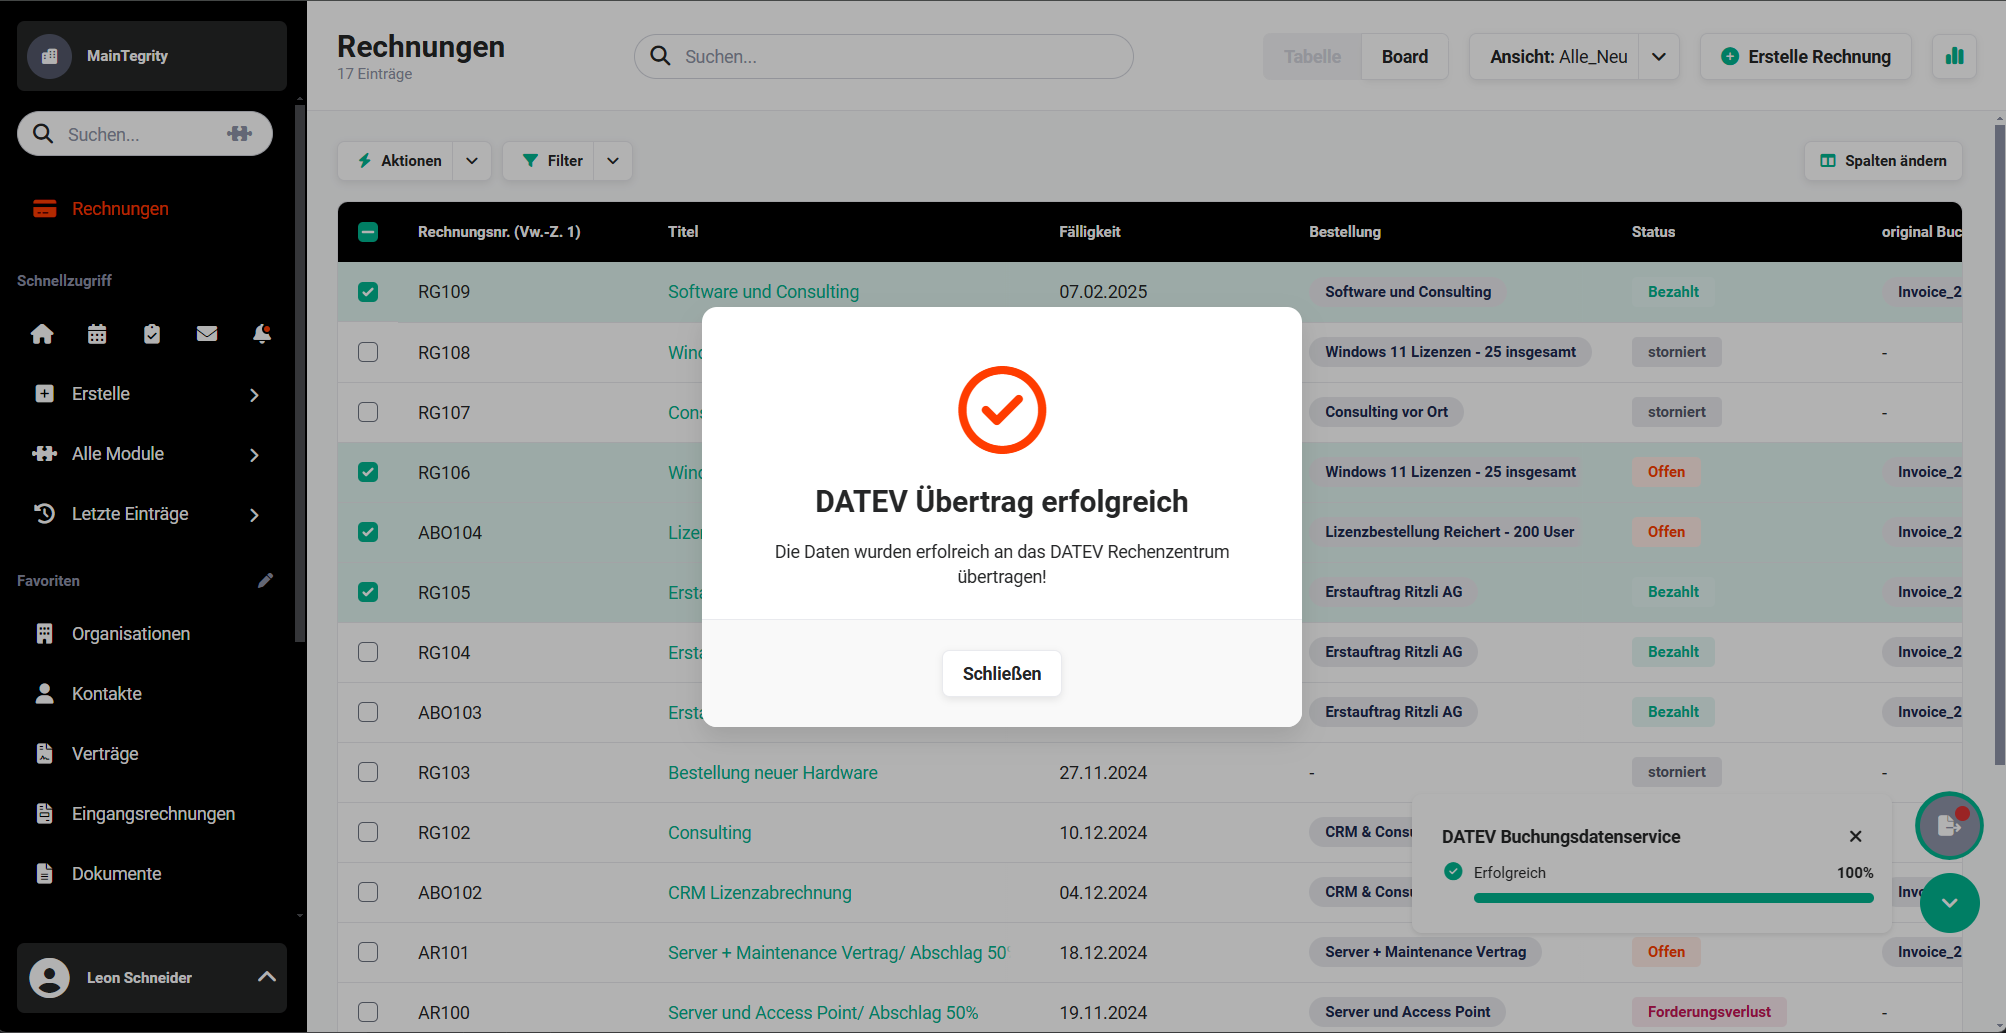 DATEV Buchungsdatenservice - note transfer successful
As soon as the transfer from brainX to DATEV has taken place, all invoices in brainX are automatically set to “posted” in order to prevent editing or deletion of records and thus to ensure audit security.
Should the DATEV transfer not be able to be carried out successfully, this is displayed accordingly → see section Error messages.
Descriptions of the DATEV workspace
The following description of the DATEV workspace is generally not relevant for normal DATEV users, as these steps are normally carried out by the tax advisor. Nonetheless, they are listed here for the sake of completeness.
In the DATEV workspace, open the accounting for the desired client. You now go directly to the “Kanzlei - Rechnungswesen” view:
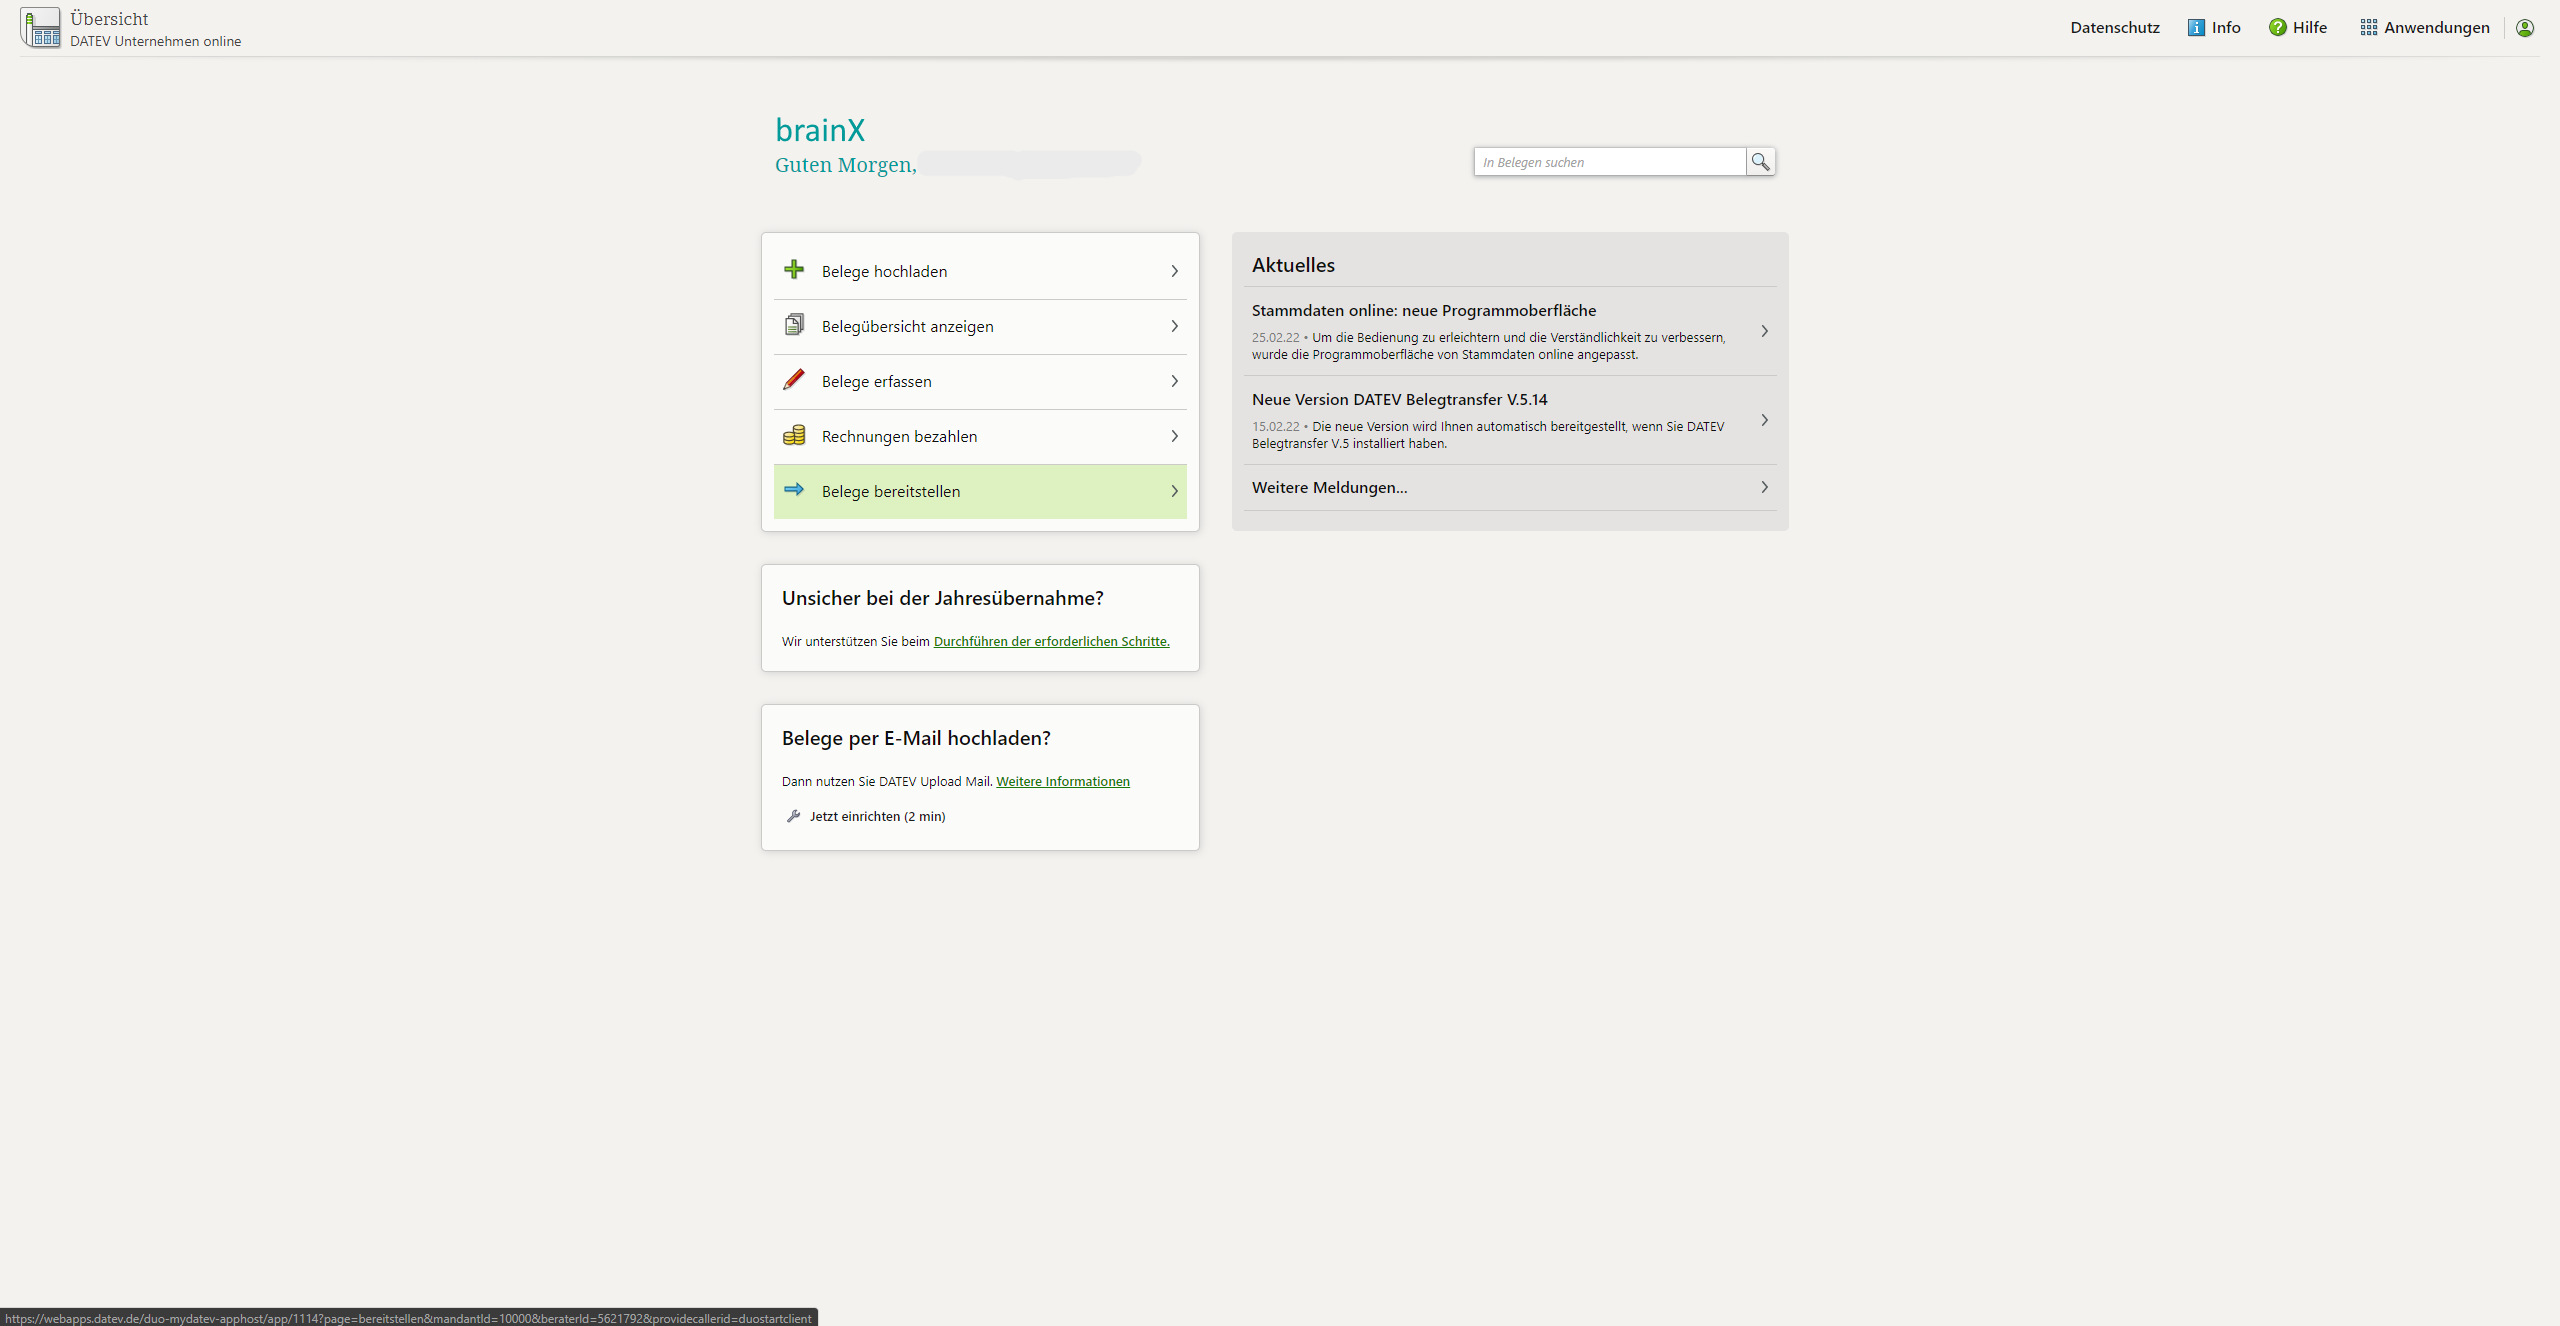 DATEV Unternehmen online - overview
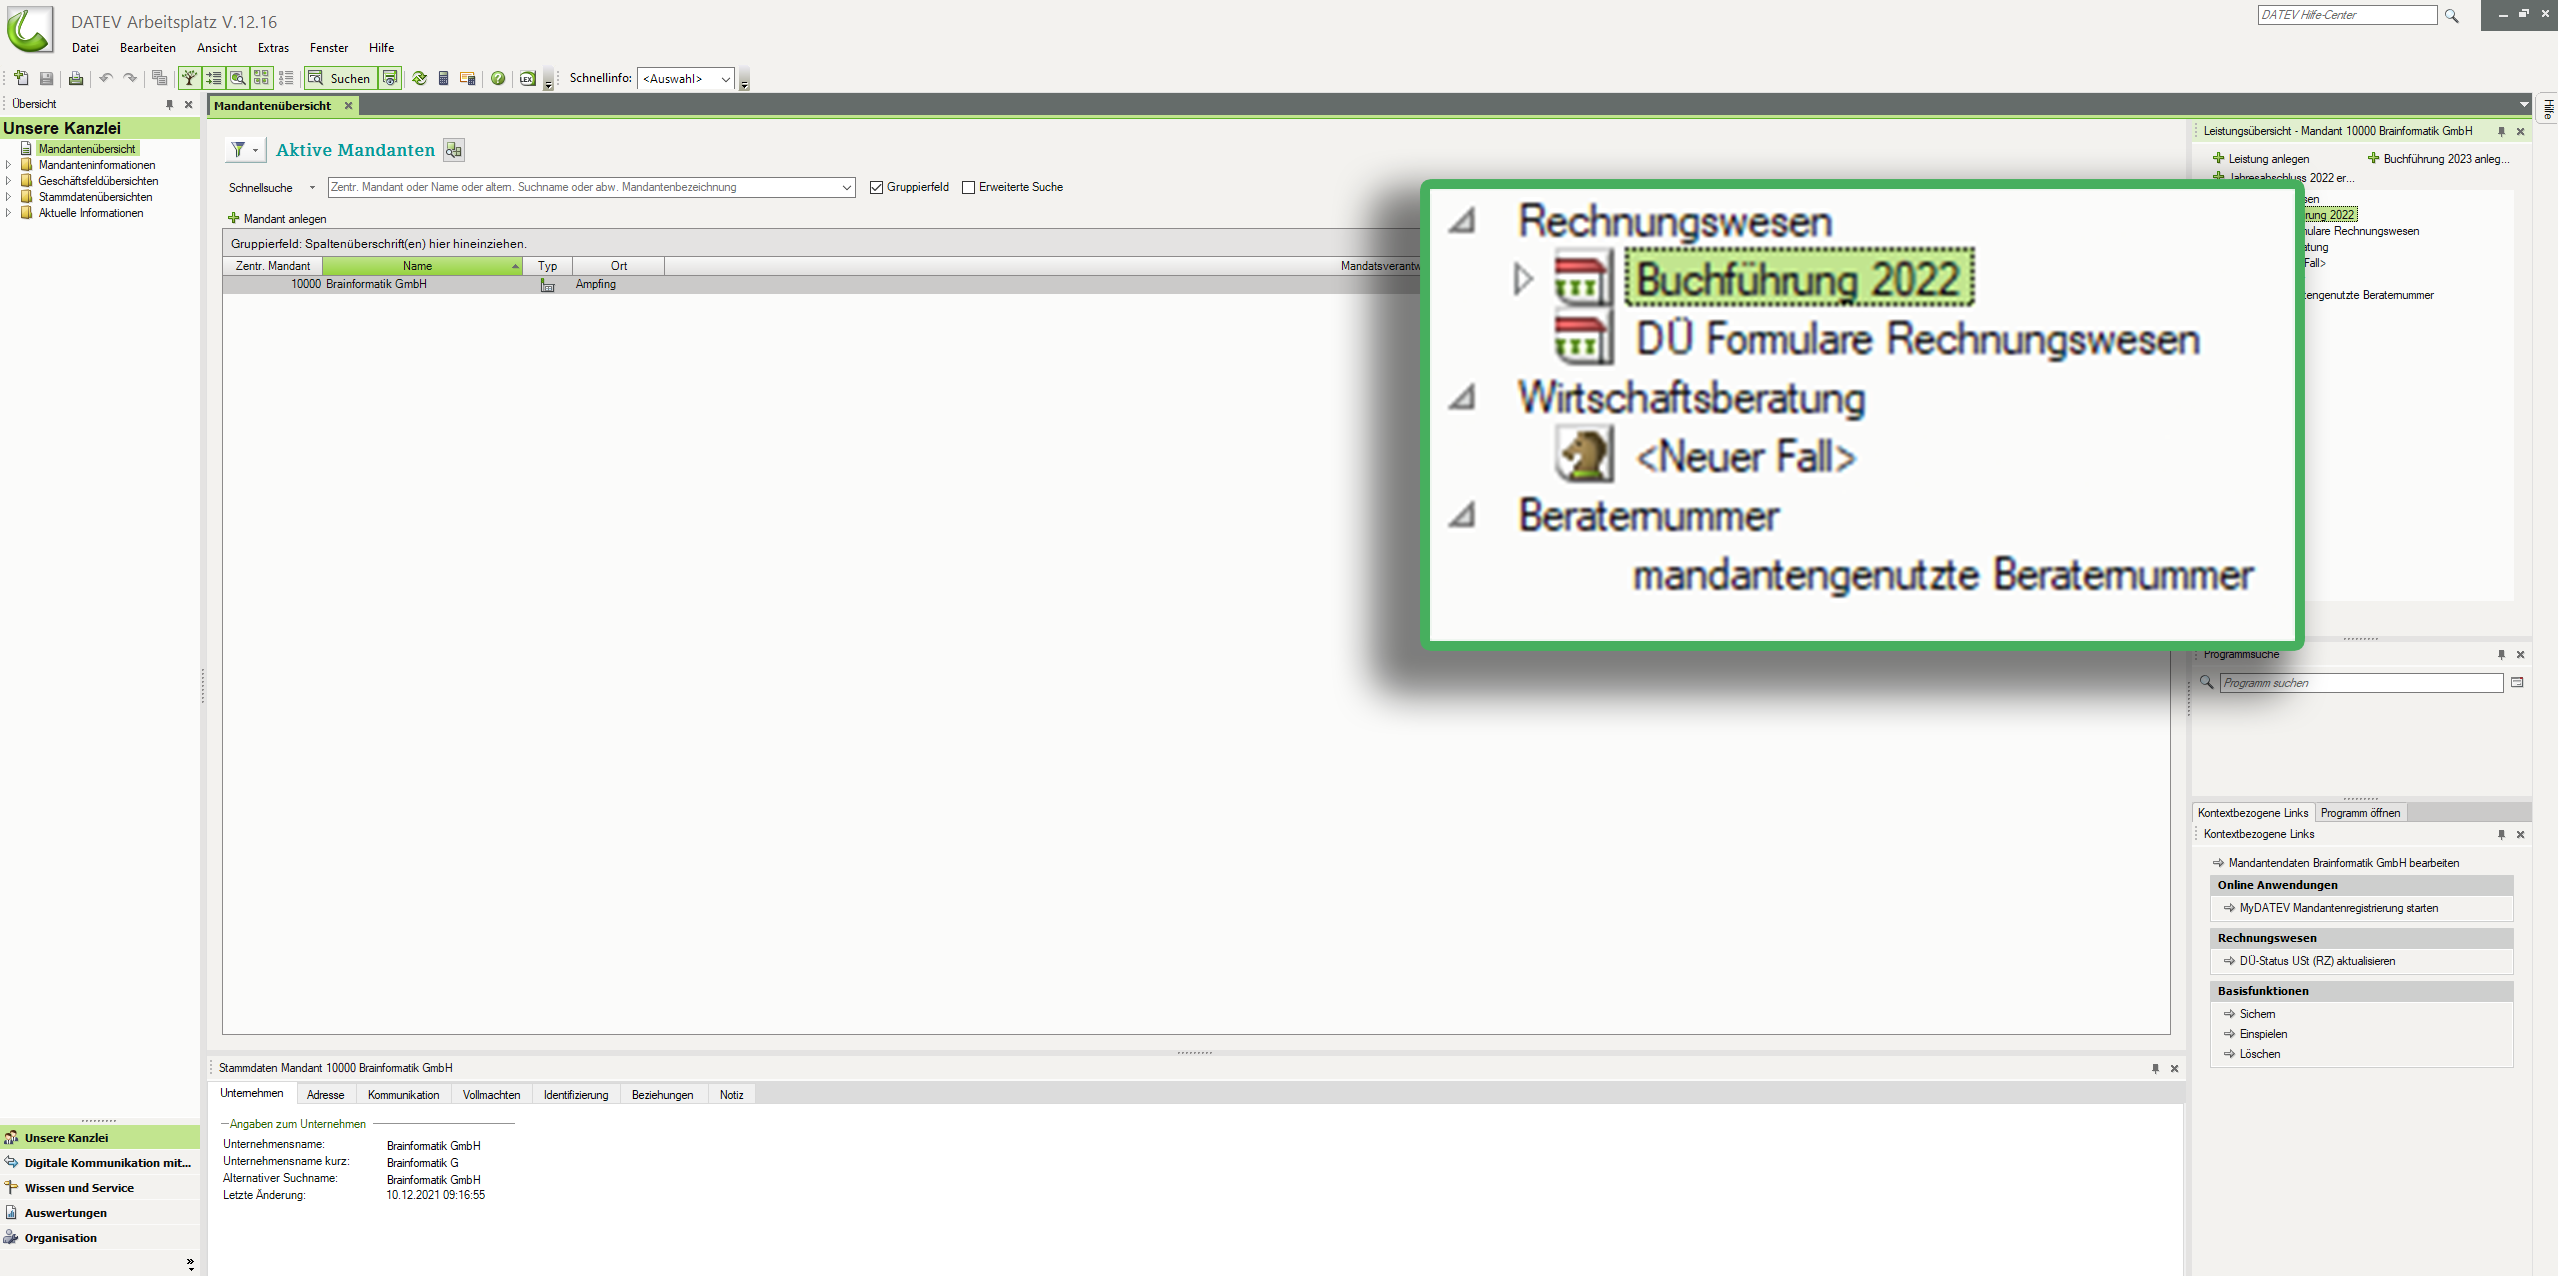 DATEV Unternehmen online - Kanzlei Rechnungswesen
Executing “Add client” is essential, as only in this way is the data transferred from brainX retrieved into “DATEV Rechnungswesen”:
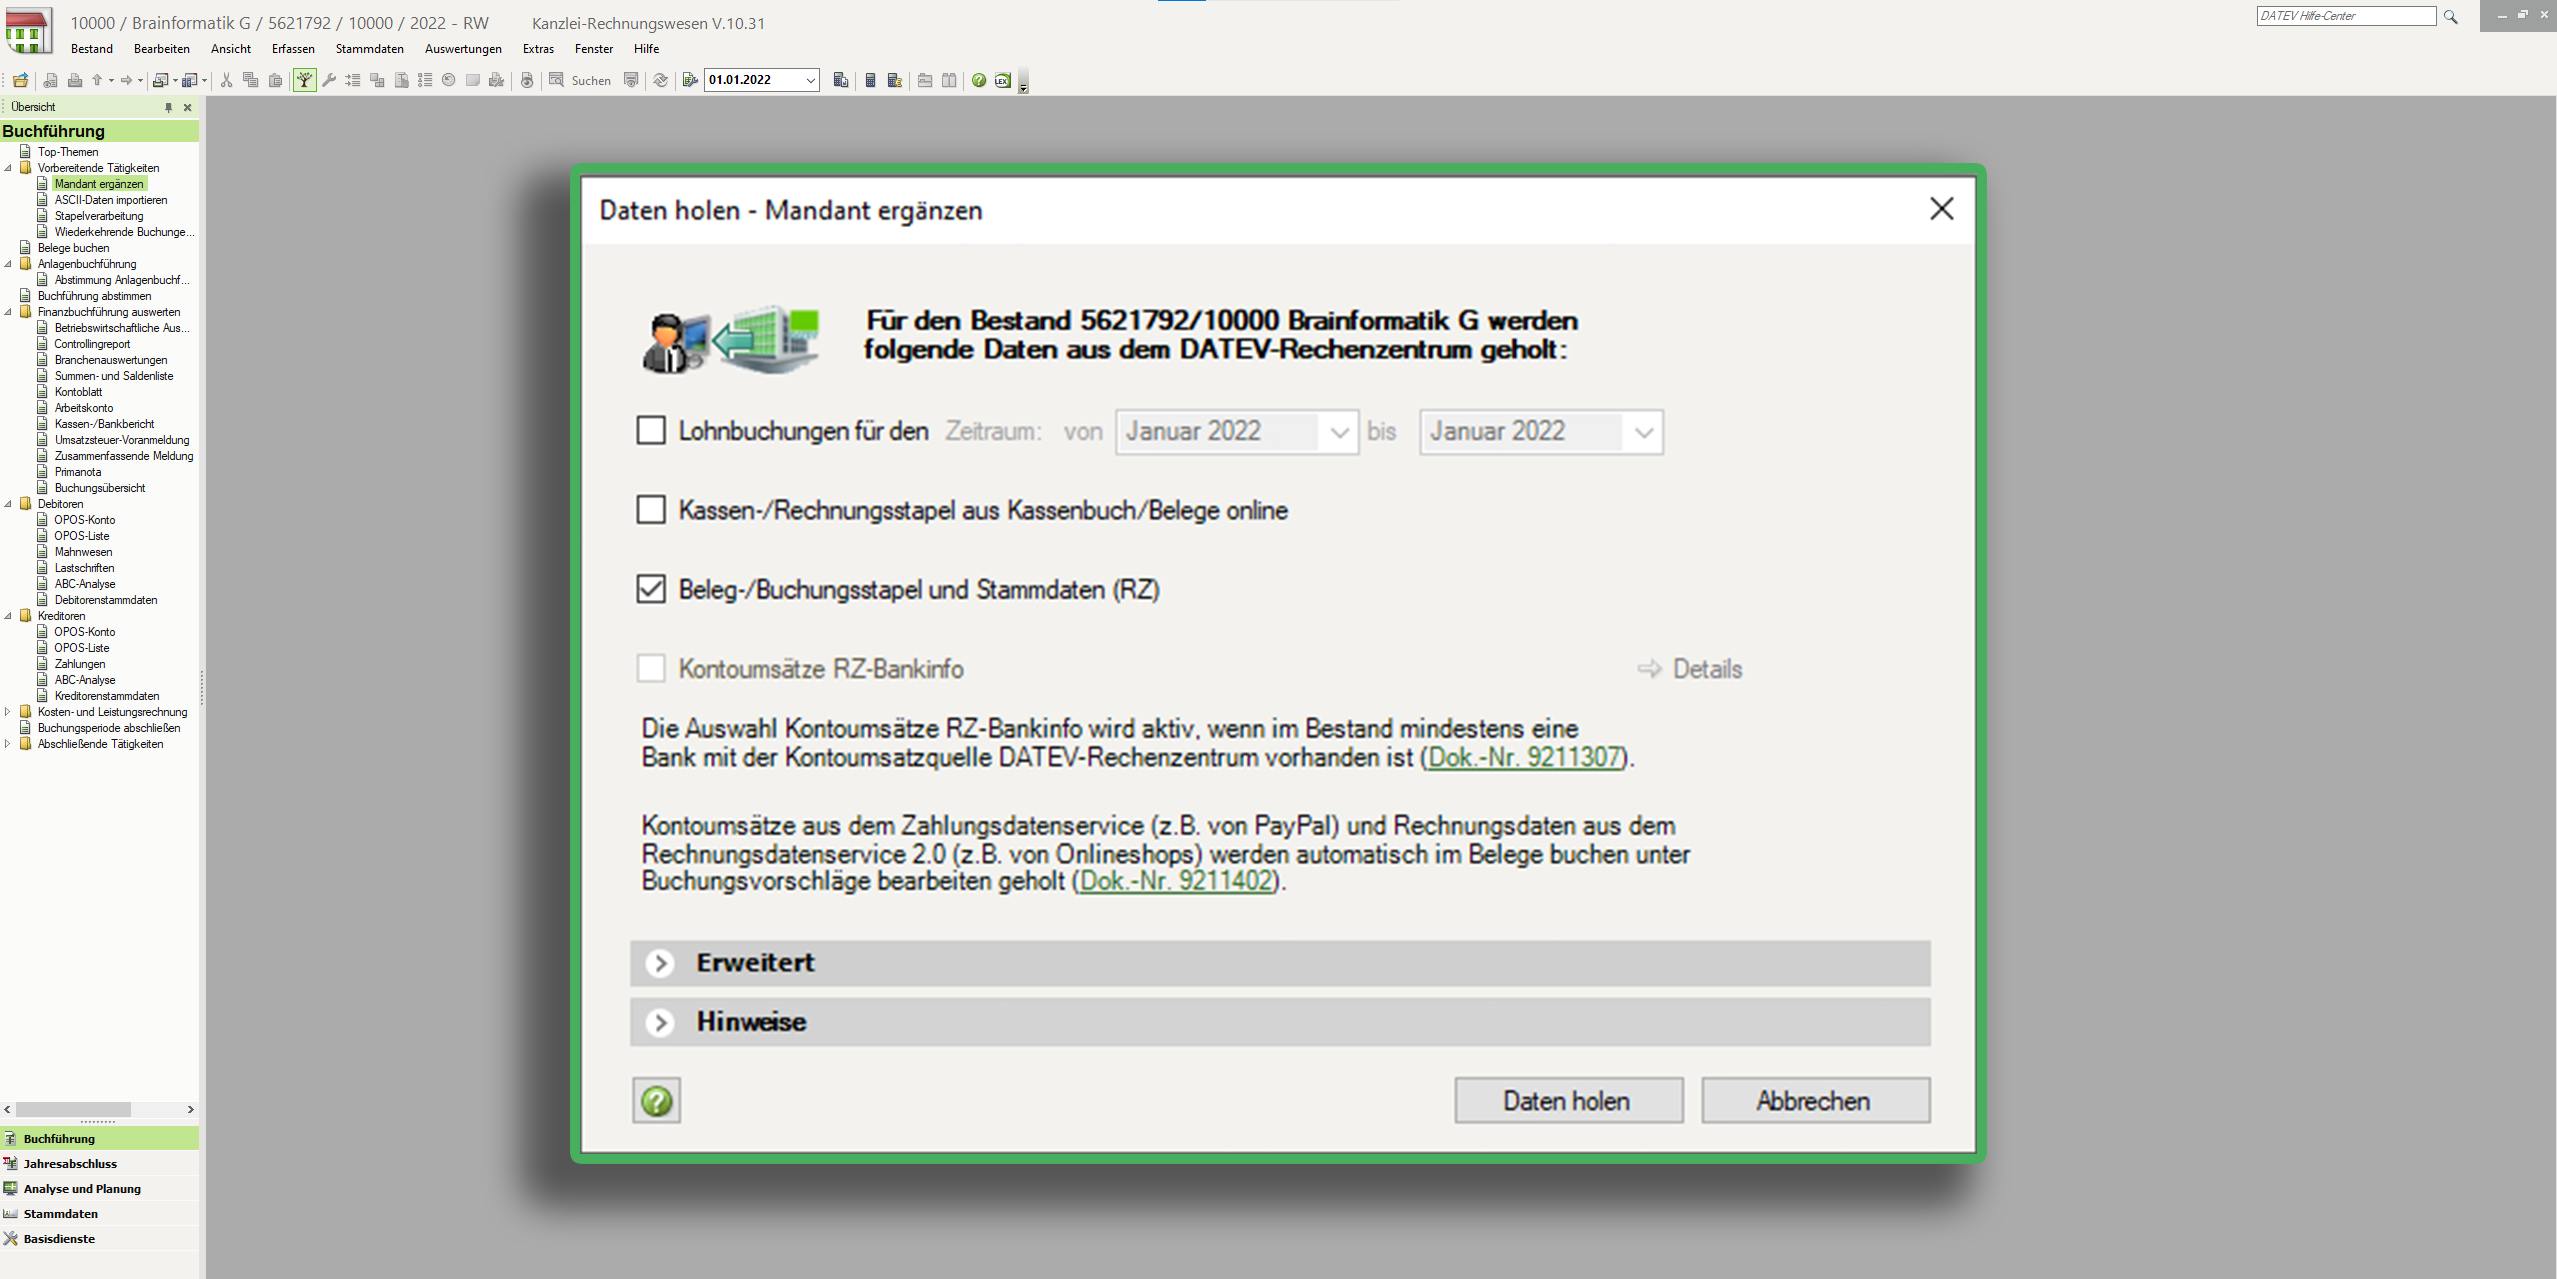 DATEV Unternehmen online - add client
Note on the status of the processing log:
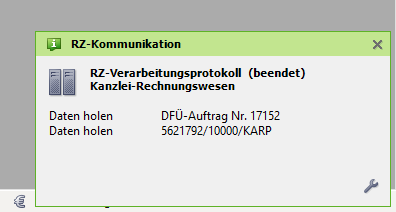 DATEV Unternehmen online - processing status
Via batch processing you now find the master data and accounting data to be processed:
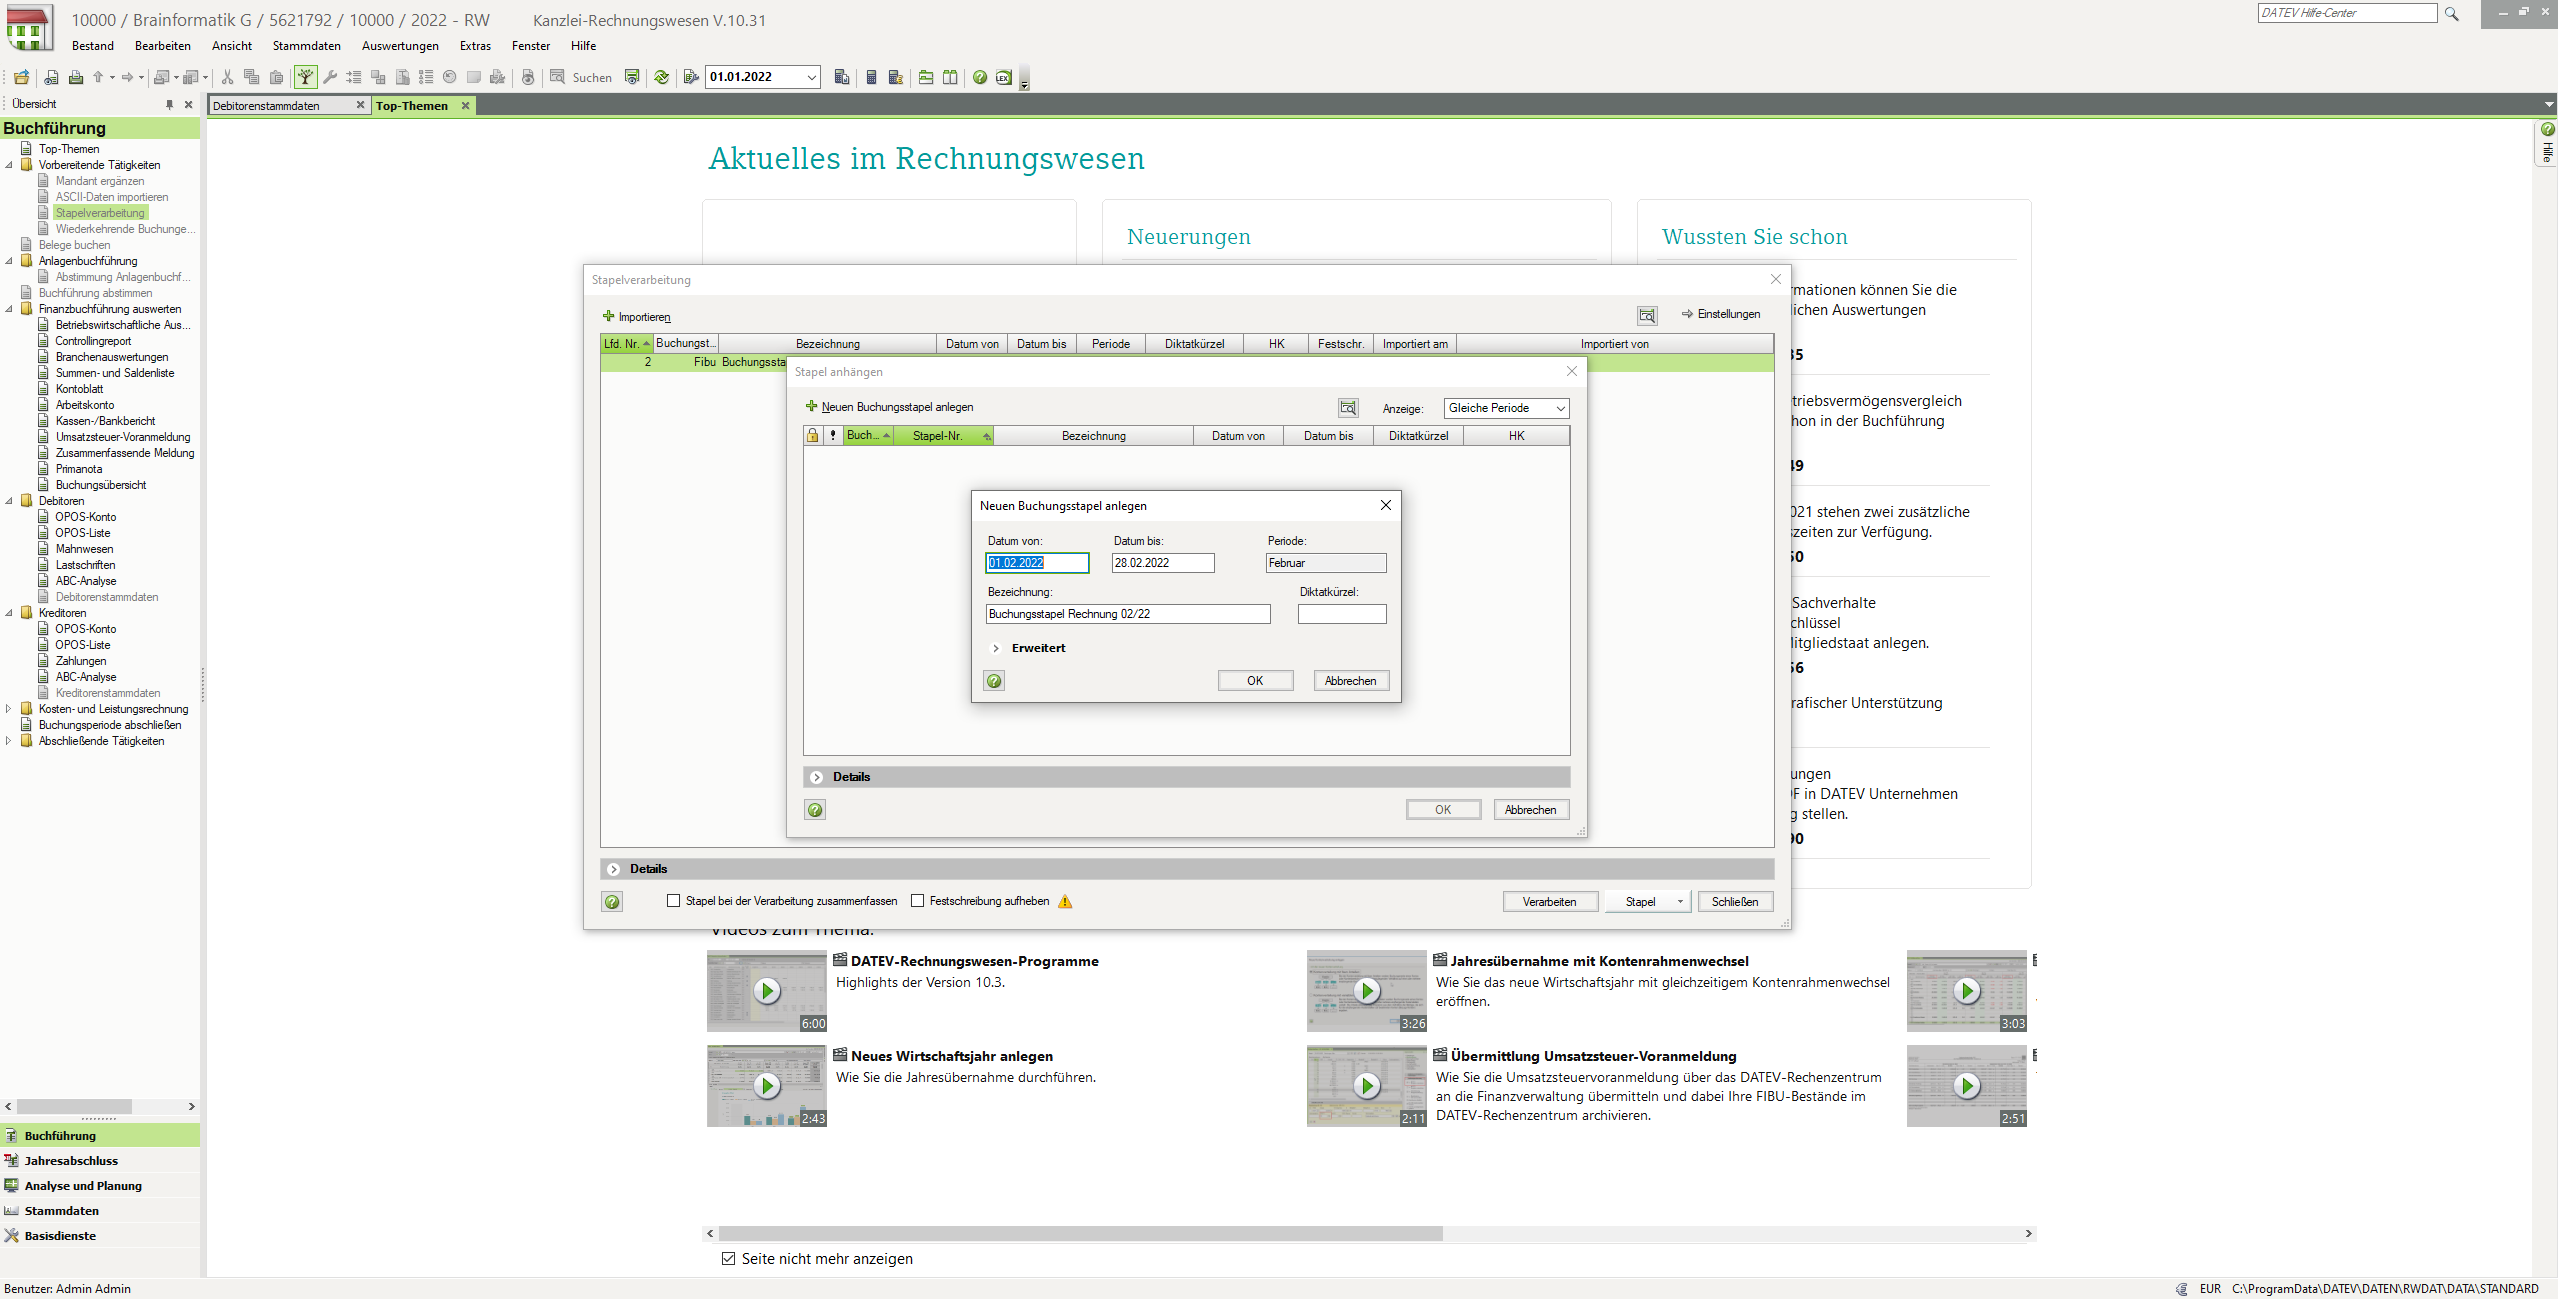 DATEV Unternehmen online - batch processing
Following this, in the master data overview you can view all transferred debtors or creditors with the corresponding stored metadata from brainX:
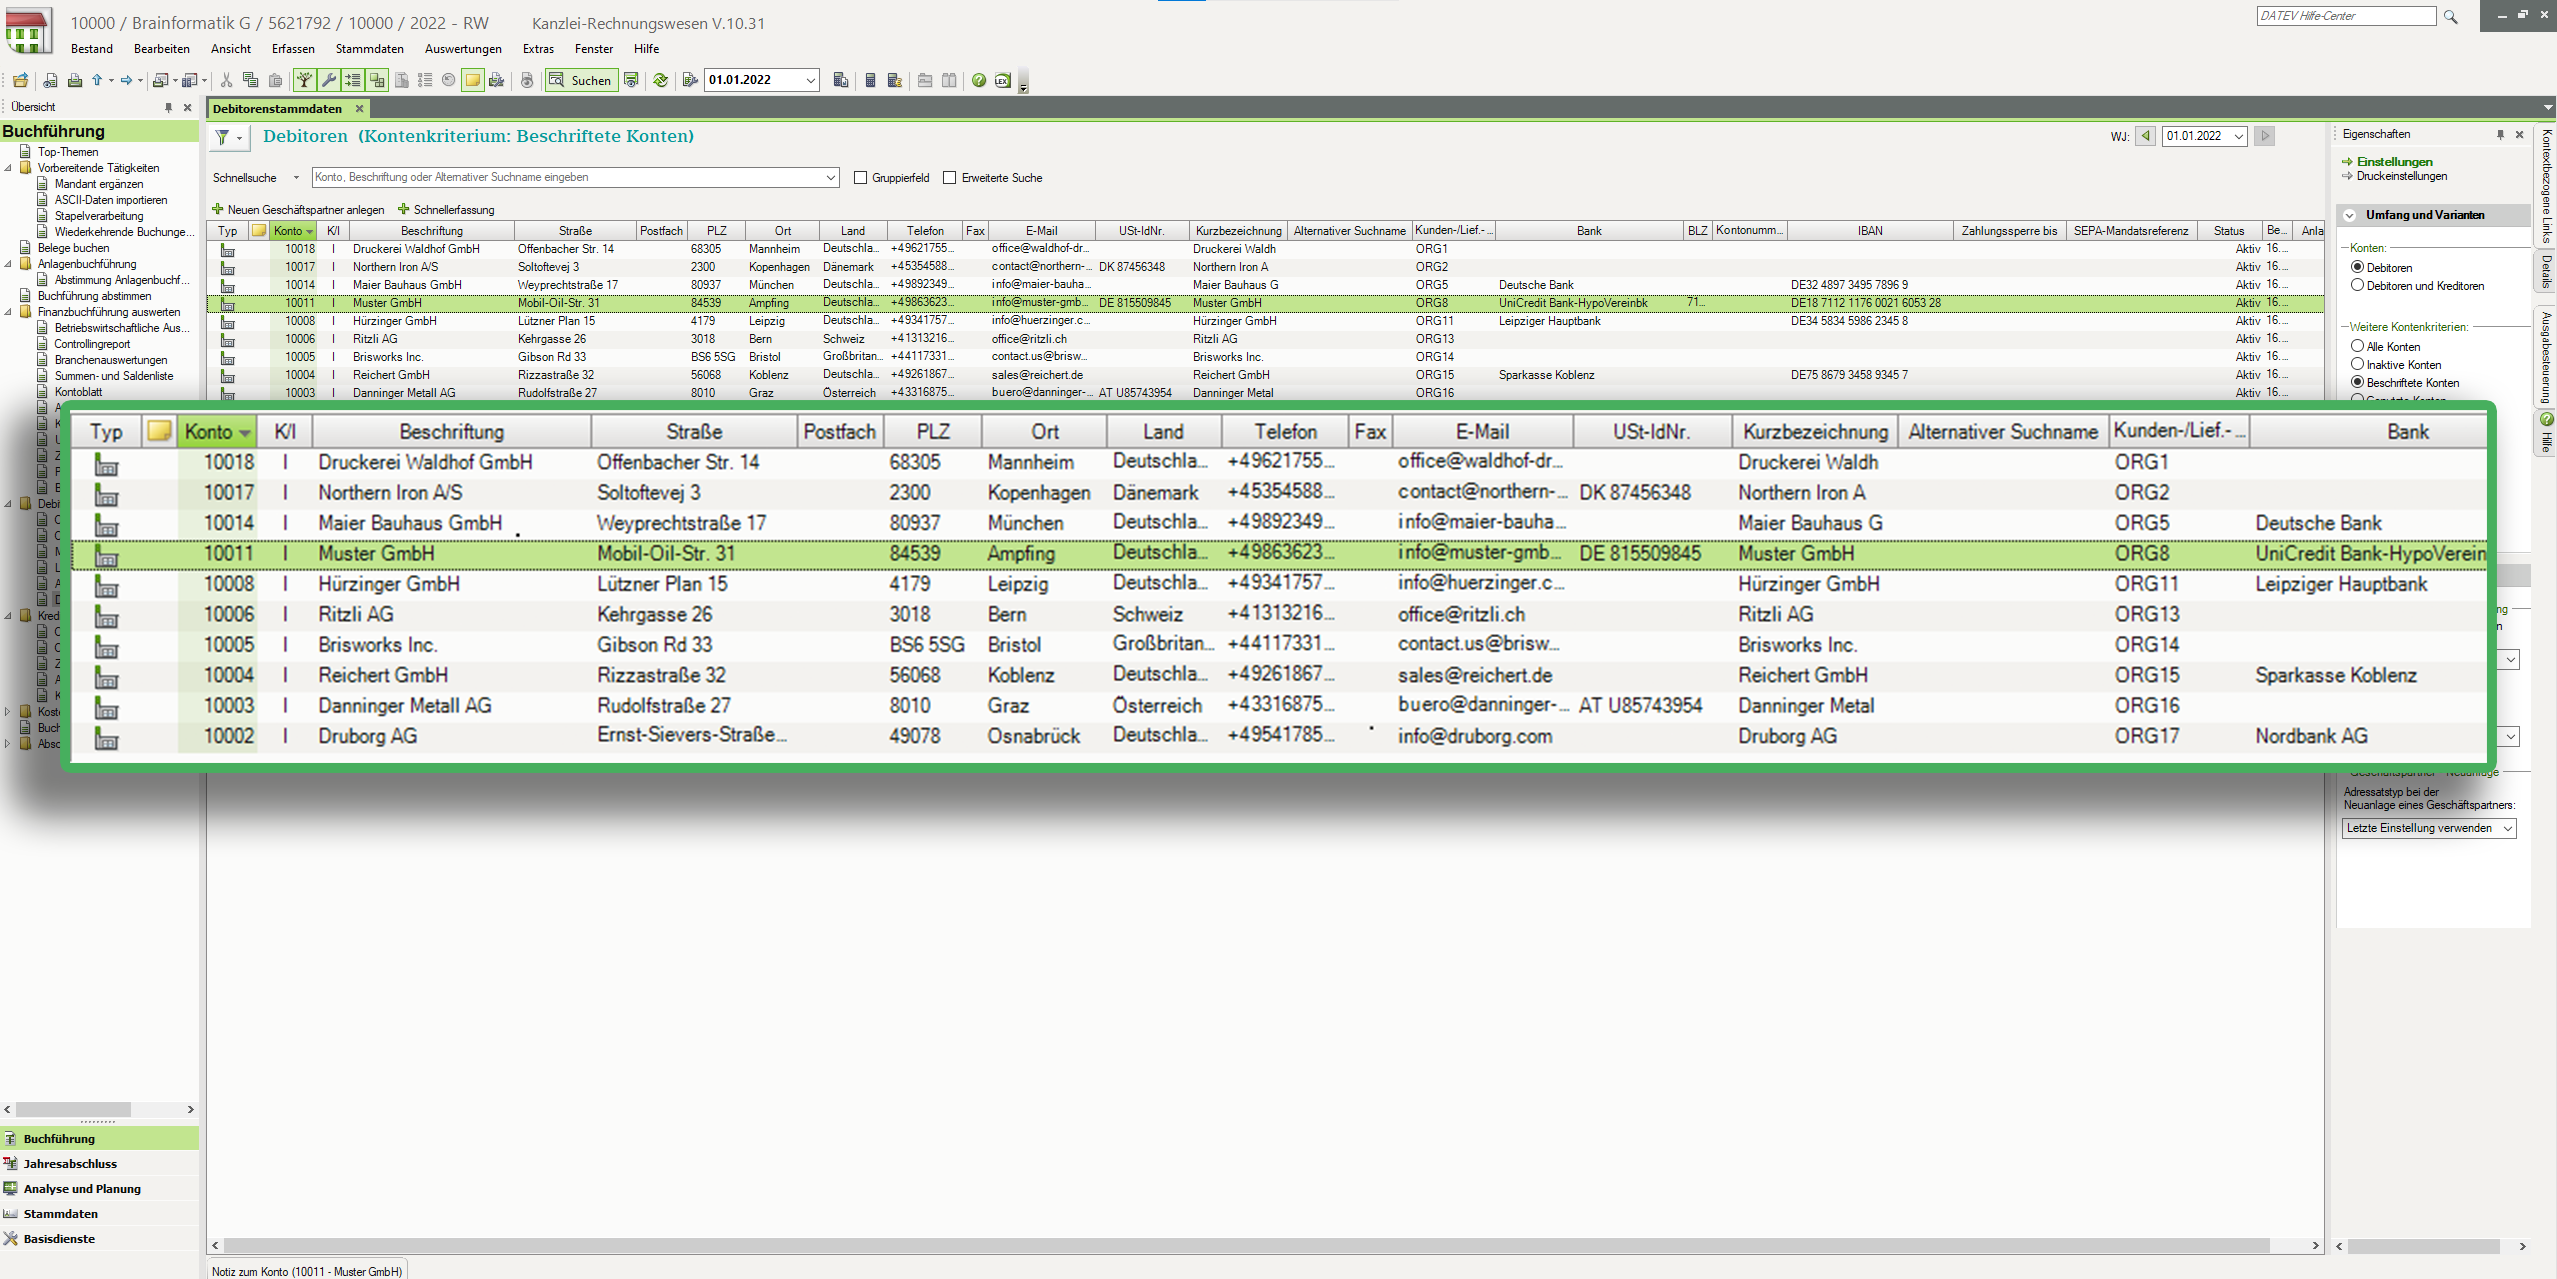 DATEV Unternehmen online - master data overview
Furthermore, all newly created accounting records that were transferred from brainX are listed in the posting overview. In the detail view you find all information on the actual posting, exactly as you previously defined it in brainX:
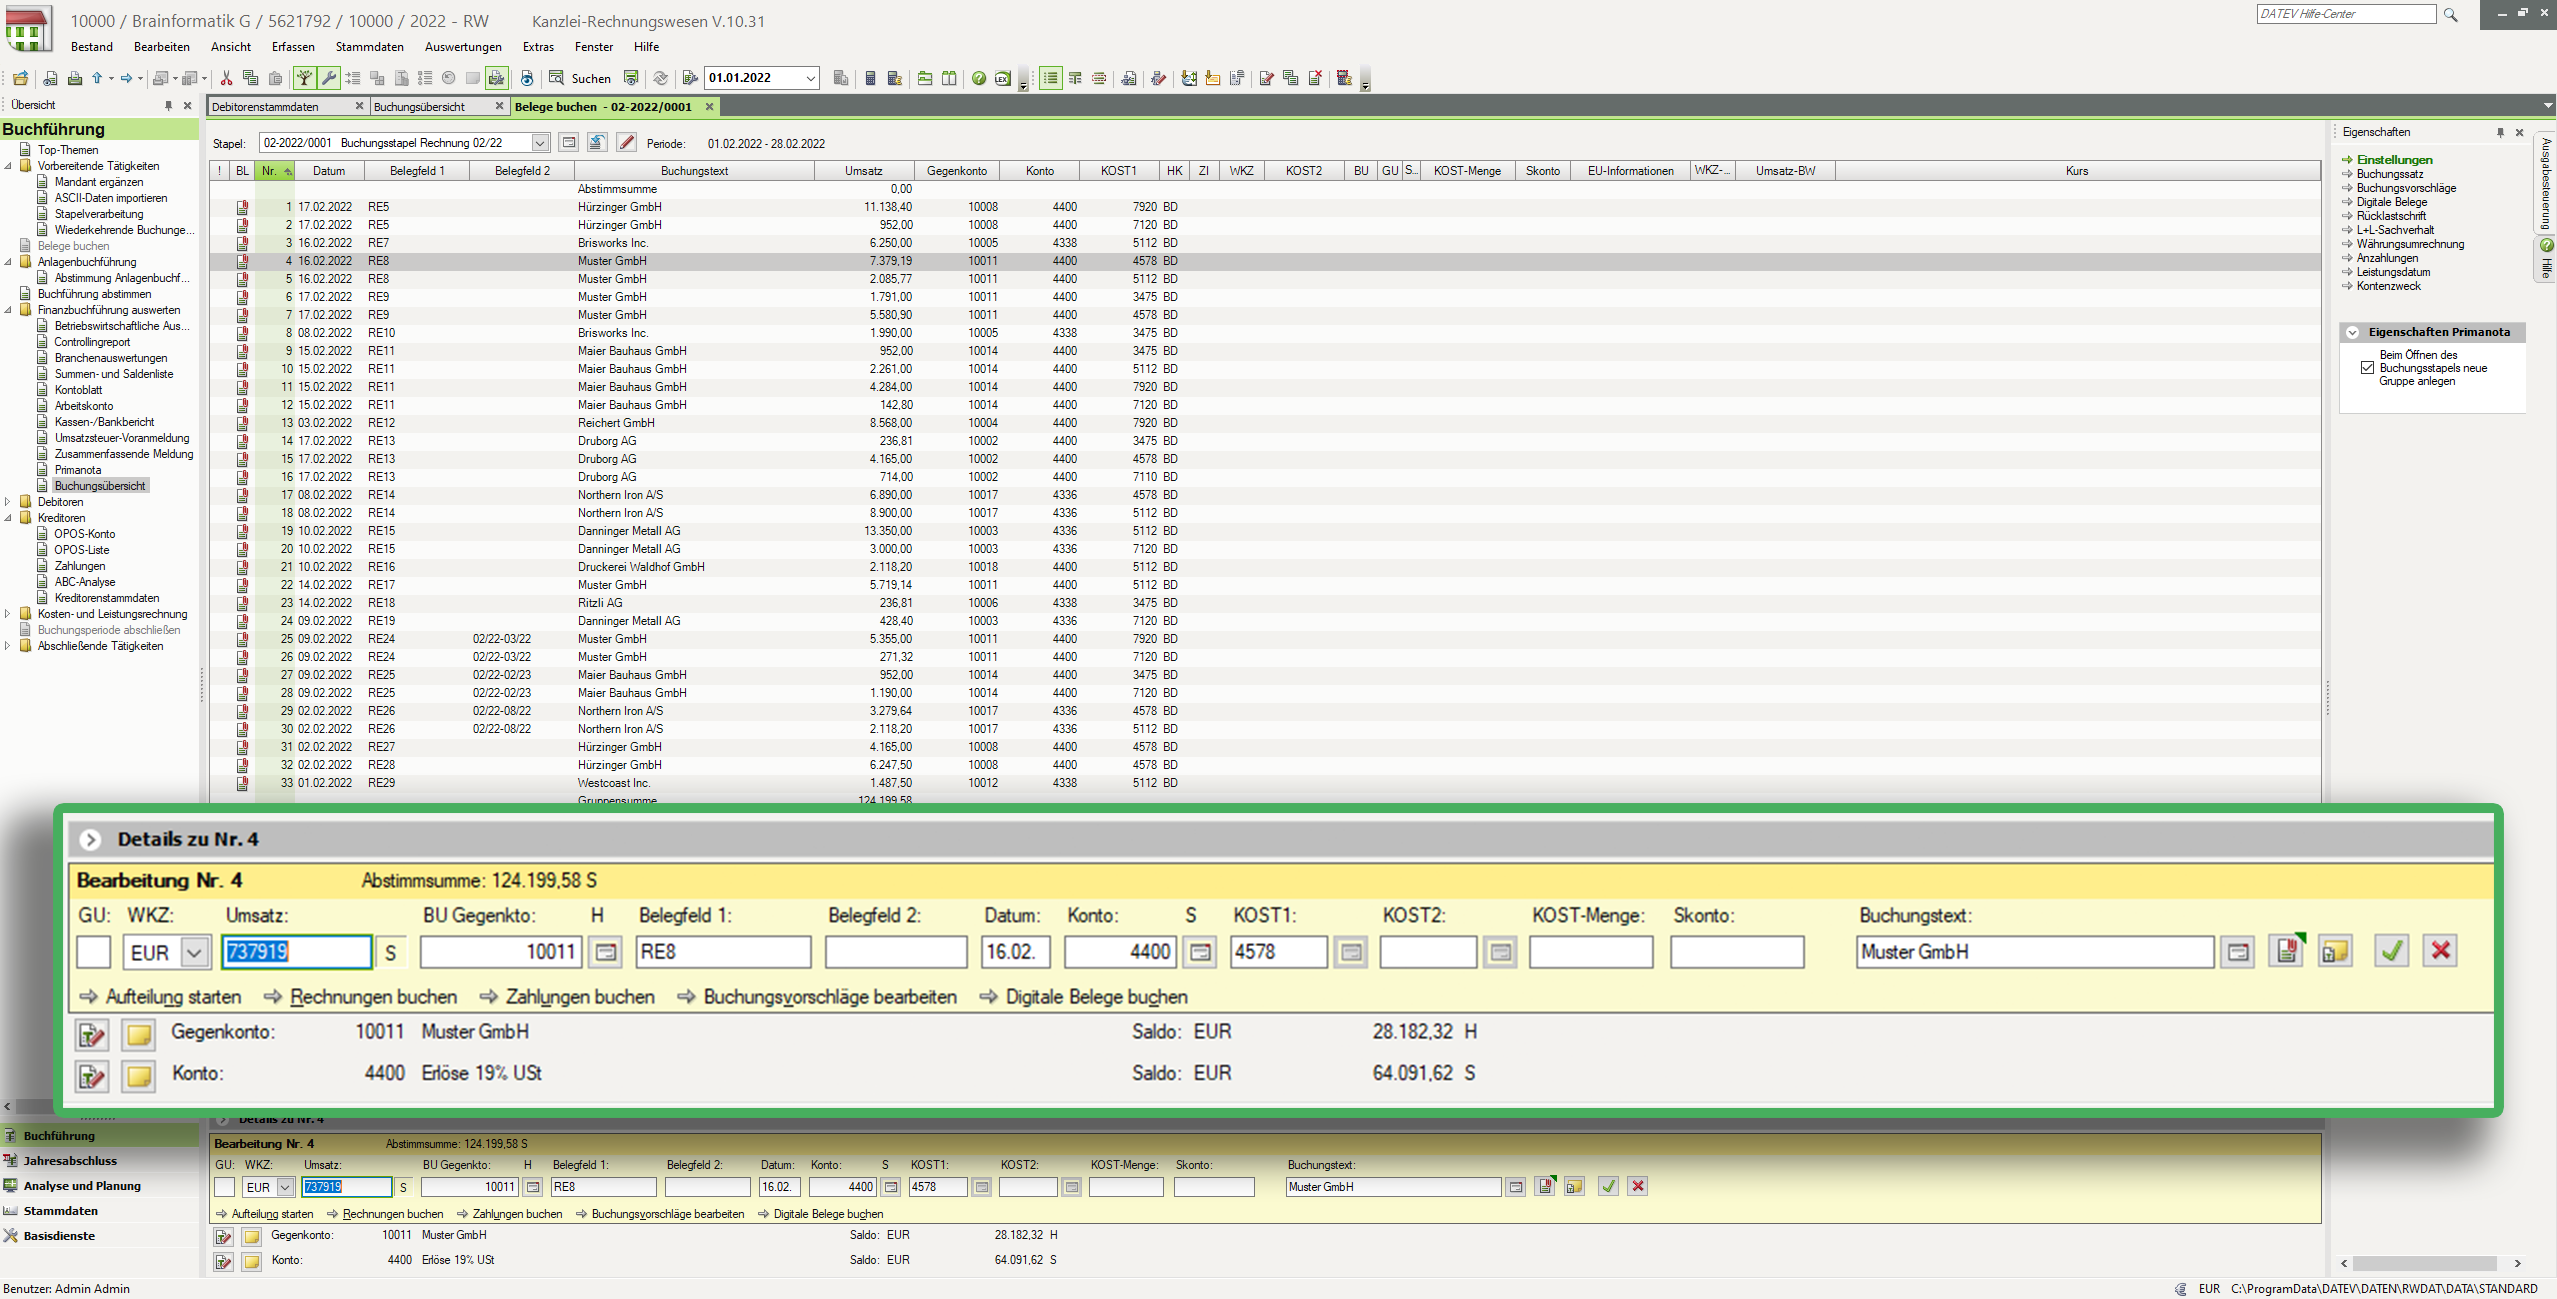 DATEV Unternehmen online - posting overview
2.5.1.2. DATEV Buchungsdatenexport
The “DATEV Buchungsdatenexport” action, in contrast to the DATEV Buchungsdatenservice action, only generates a ZIP file (compressed file), which can then be used in accounting software - or transmitted directly to the tax advisor.
2.5.2. Accounting documents
In the Billing modules Invoices, Incoming Invoices, Cancellations and Credits, fields for accounting documents are available:
2.5.2.1. “original accounting document” field
The “original accounting document” field offers the possibility to link a document with the corresponding record. It is needed to note the document that was sent to the customer.
The accounting document must strictly correspond to the document that was sent to the invoice recipient. A PDF or image file must be stored in this document. There is the possibility to set the customer document by normal editing of the record. In this case, all referenced document records are available for selection. The accounting document can also be set by a PDF export or an automation (email with PDF attachment).
2.5.2.2. “last accounting document” field
The “last accounting document” field is a reference field to the most recently created accounting document. This last accounting document can be, for example, an invoice including dunning fees.
Both the original accounting document and the last accounting document are transferred to “DATEV Unternehmen online” and used as the accounting document.
The last accounting document is only used when transferring the dunning fees (with the Buchungsdatenservice). If the dunning fees have been deactivated, the last accounting document is never transferred with the Buchungsdatenservice.
Accruing dunning fees are transferred in the month in which they accrue. In this case, the last accounting document is used for the transfer.
If the DATEV integration is active, then the option “Use as accounting document” is active by default during the PDF export!
2.5.3. Error messages
Should field values be missing in one or more record(s) that prevent a correct export, this is displayed in a popup. Both the records (directly clickable via link) and detailed error messages are displayed here.
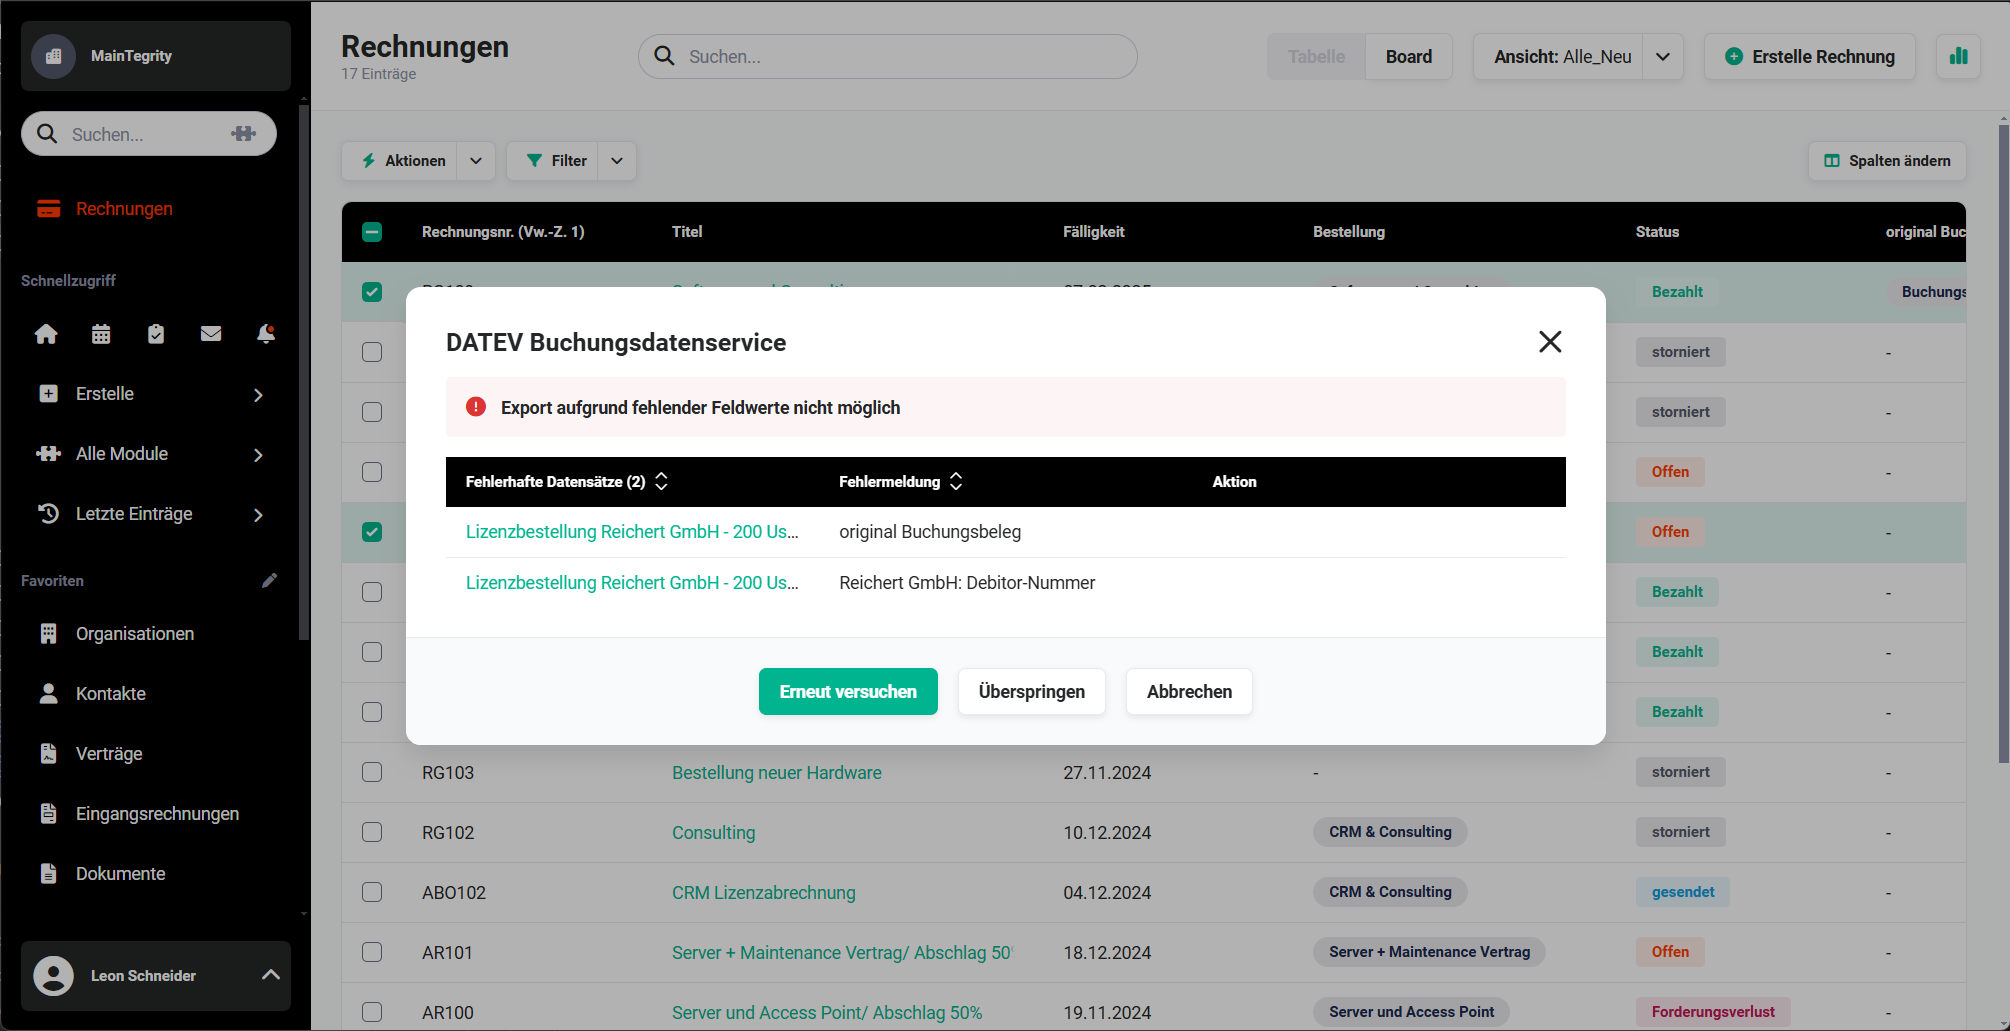 DATEV Buchungsdatenservice - error message popup
2.5.4. Limitations
If the “DATEV Buchungsdatenservice” integration is active, the following must be noted:
- The product block in records of the Incoming Invoices module is strictly necessary!
- The “Record incoming invoice” action in the list view actions is no longer available, as there is no product block in the quick-creation popup. Incoming invoices must then generally be created via the normal creation view.
3. Deferred Income accounting
Deferred income accounting (in German: passive Rechnungsabgrenzung, PRA) is an item on the liabilities side of the balance sheet that ensures income is allocated to the correct period.
Deferred income arises when a company receives money in advance but the associated service is not provided until a later period.
The company therefore has an obligation to still provide a service in the future - which is why the amount belongs on the liabilities side (as short-term outside capital).
Memory aid: Deferred income = income economically belongs to the next year.
Section 252 (1) no. 5 of the German Commercial Code (HGB) states precisely: “Expenses and income of the financial year are to be taken into account in the annual financial statements irrespective of the dates of the corresponding payments.”
In section 250 (2), with regard to the liabilities side, it is additionally specified: “On the liabilities side, income received before the balance sheet date is to be reported as a deferred item, insofar as it represents income for a certain period after that date.”
Deferred income accounting is an important instrument to ensure a realistic representation of a company’s assets and earnings situation. In doing so, expenses and income are systematically allocated in order to ensure period-accurate recording in the accounting. By taking into account future payments and services in the current balance sheet, shortfalls can be avoided and the current financial status can be represented exactly.
Simply put, before the balance sheet date, i.e. before the transition into the new accounting period, there is a payment. However, the service is only provided by your company - at least in part - in the next year. In this case, one speaks of a proportional deferred income item (pRAP). This is part of the balance sheet and appears on the liabilities side. Without the deferred items, the balance sheet would be incomplete. Banks also use this procedure to record payments already received that only accrue as income or expenses at a later point in time.
A customer already pays €1,200 in December 2025 for an annual subscription that only takes effect in 2026.
2025: Payment is already there, service not yet → deferred income in the amount of €1,200
2026: The service is provided → PRA is reversed and posted as revenue
If you have further questions on the topic of “Deferred Income accounting”, please contact your accounting department or your tax advisor.
3.1. Activation
When the DATEV Buchungsdatenservice integration is used, the “Deferred Income accounting” must be activated explicitly.
In the company information, in the “DATEV Buchungsdatenservice” setting item, there is the “Deferred Income accounting” block. This block contains the following fields:
- Activate Deferred Income accounting → toggle to activate deferred income accounting
- Account number for accrual account → input field for the account number of the accrual account (in medium-sized companies usually account number 3900).
The account number for the accrual account must contain exactly 4 digits! - Account number for VAT → input field for the account number of VAT (in medium-sized companies usually account number 3800)
The account number for VAT must contain exactly 4 digits! - Minimum amount for accrual → input field for the minimum amount for the accrual (under § 5 (5) sentence 2 EStG, a deferred or accrued item does not have to be created if the individual expense or income does not exceed the amount of 800 euros)
If the toggle in the “Activate Deferred Income accounting” field is set to “on”, a note popup is displayed:
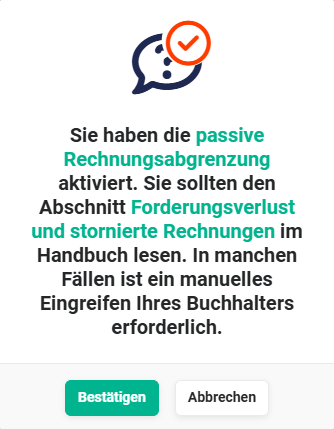 Popup activation Deferred Income accounting
The note contains two links to the handbook that refer to the sections “Deferred Income accounting” and “Bad debt loss and cancelled invoices”.
The sections “Deferred Income accounting” and “Bad debt loss and cancelled invoices” should definitely be read by all users who work with the Invoices module!
After clicking the “Confirm” button, deferred income accounting is activated. A notification of the activation is now displayed.
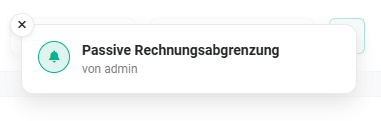 Notification activation Deferred Income accounting
In the sidebar of the notifications, reference is again made via link to the sections “Deferred Income accounting” and “Bad debt loss and cancelled invoices”.
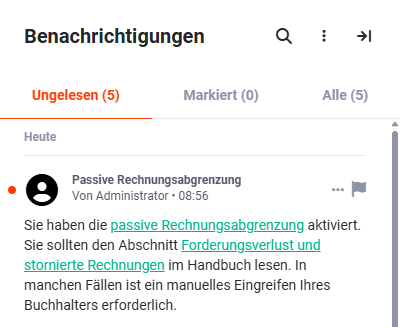 Notifications sidebar - activation Deferred Income accounting
3.2. Usage
The use of deferred income accounting is explained below using an example, assuming the following prerequisites:
- Service period start: 08/12/2025
- Service period end: 07/12/2026
- Invoice amount: 14875.00 EUR (net sum: 12500.00 EUR / VAT: 2375.00 EUR)
- Financial year: 01/01 - 31/12
If this invoice is now exported via the “DATEV Buchungsdatenexport” action in the list view of the Invoices module, the following popup is displayed:
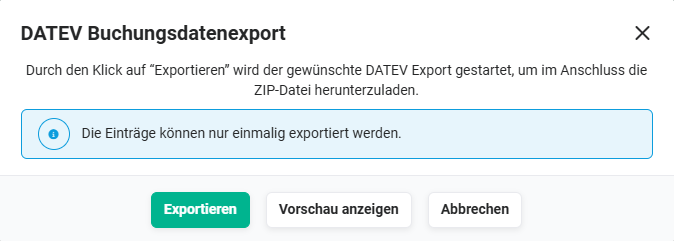 Popup DATEV Buchungsdatenexport
After clicking the “Show preview” button, the “Preview” popup opens:
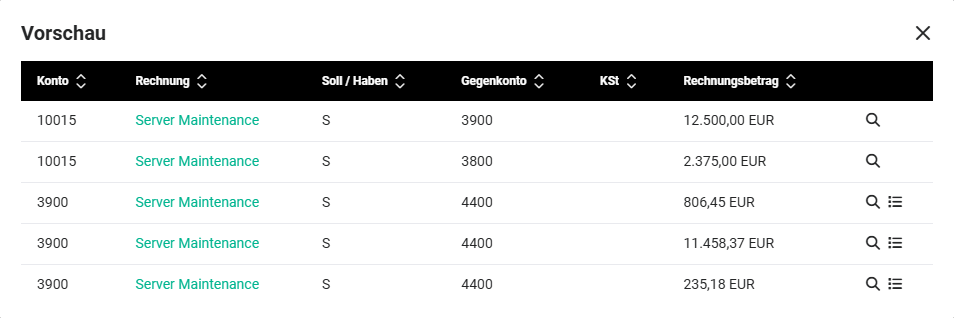 Preview invoice “Server Maintenance”
The table in the “Preview” popup contains the following columns:
- Account → account number
- Invoice → title of the invoice
- Debit/Credit → display for debit (S) and credit (H)
- Contra account → account number of the contra account
- CC → cost centre number
- Invoice amount → display of the invoice amount
- Actions
- “magnifying glass” action icon → opens the file preview of the invoice
- “list” action icon → opens the “Posting plan” popup
The “Posting plan” popup (for the 4th entry in the preview - invoice amount 11458.37 EUR) appears as follows:
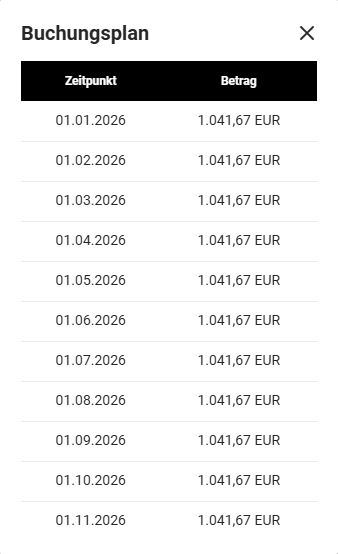 Posting plan popup
The table in the “Posting plan” popup contains the following columns:
- Point in time → point in time/date of the posting
- Amount → amount of the posting
With deferred income accounting, income is allocated to the correct period when the invoice has already been issued but the associated service period falls wholly or partly into a future period.
Tax treatment
At the time of the transfer to the accrual account, the VAT is determined and posted separately. The tax is not deferred but assigned directly to the corresponding VAT account and remitted.
Posting logic
- Only the net invoice amount is posted to the accrual account.
- The VAT is not posted to the accrual account but separately to the respective VAT account.
- The account number used for deferred income accounting can vary (the standard account is 3800).
Representation in the preview
In the preview, the invoice amounts are displayed exclusively as net amounts. At this point the VAT has already been deducted and is shown separately.
Summary
With deferred income accounting, the VAT is calculated in advance, deducted from the invoice amount and posted separately. On the accrual account, therefore, only the net portion of the income is carried.
In the list view of the invoices, only 1 invoice was selected for the preview.
- Invoice “Server Maintenance”
- Invoice amount: 14875.00 EUR (net: 12500.00 EUR / VAT: 2375.00 EUR)
- Service period start: 08/12/2025
- Service period end: 07/12/2026
The “Preview” popup appears as follows:
In the preview, five entries are listed:
- Row 1: posting 12500.00 EUR from account 10015 to the contra account 3900 (accrual account)
- Row 2: posting 2375.00 EUR from account 10015 to the contra account 3800 (VAT account)
- Row 3: posting 806.45 EUR from account 3900 (accrual account) to the contra account 4400
Posting plan: point in time 08/12/2025, amount 806.45 EUR
- Row 4: posting 11458.37 EUR from account 3900 (accrual account) to the contra account 4400
Posting plan: point in time in each case the 1st of the month from month 01 to 11 → 11 x 1041.67 EUR
- Row 5: posting 215.18 EUR from account 3900 (accrual account) to the contra account 4400
Posting plan: 01/12/2026, amount 235.18 EUR
3.3. Bad debt loss and cancelled invoices
In practice, it does happen that invoices receive the status “bad debt loss” or “cancelled”.
Status “bad debt loss”: Invoices receive the status “bad debt loss”, for example, when a customer does not pay an invoice despite reminders and unsuccessful dunning procedures and the receivable must be written off as uncollectible.
Status “cancelled”: Invoices receive the status “cancelled”, for example, when the invoice is fundamentally incorrect (mandatory details missing/wrong), the service was not provided, the delivery was defective or did not take place, or when a subsequent price reduction occurs.
A cancellation made for a PRAP invoice that has already been transferred cannot, by default, initially be transferred, as the accountant must intervene manually in order to avoid double reversals. However, there is a button with which the transfer can nevertheless be enabled if desired.
Automatic process for cancelled invoices
If an invoice for which a recurring posting has already been transmitted to DATEV receives the status “cancelled”, the associated recurring posting is now automatically written off: periods already executed are settled via a one-time collective correction on the cancellation date, still open periods via a mirrored recurring posting. A manual intervention by the accountant is not required for this.
Manual process for bad debt loss
If an invoice receives the status “bad debt loss” and a recurring posting has already been transmitted to DATEV, this must still be stopped and reversed manually by your accountant. The “Deferred Income accounting” notification as well as the corresponding notes in the sidebar and in the detail view of all invoices with the status “bad debt loss” remain unchanged.
After an invoice has received the status “bad debt loss” or “cancelled” via the corresponding picklist value in the “Status” field, the “Deferred Income accounting” notification is now displayed:
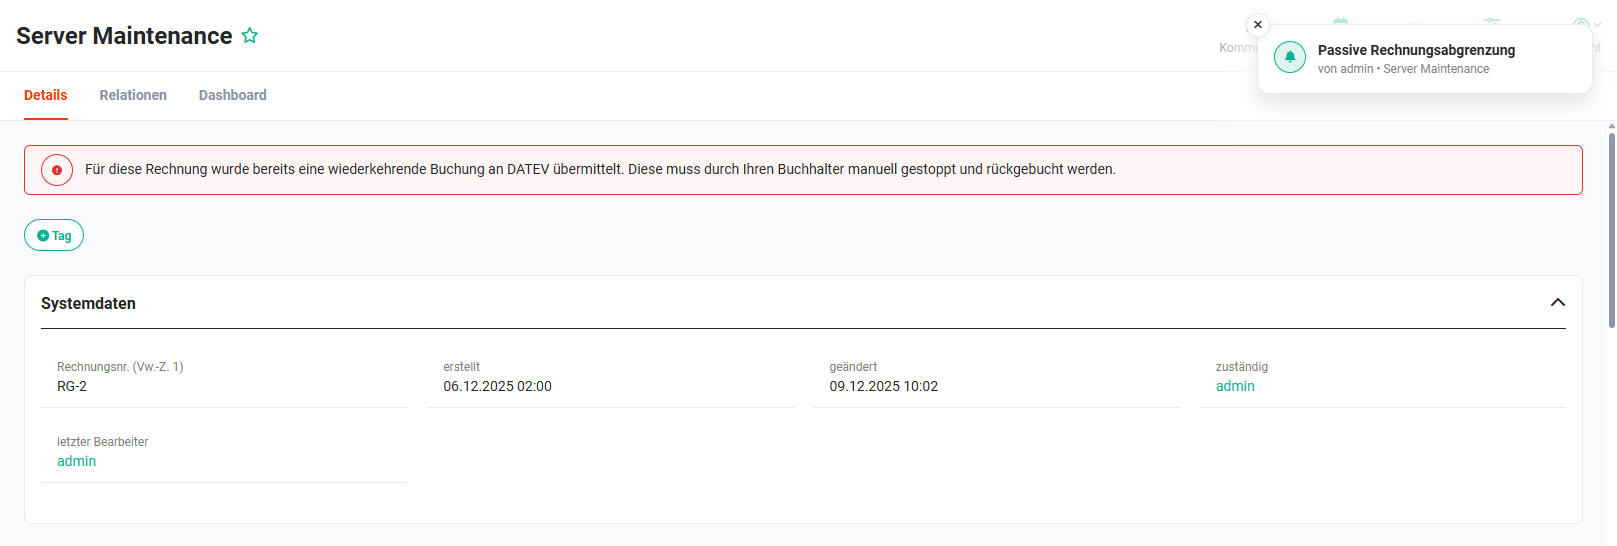 Note Deferred Income accounting
If the invoice is cancelled or set to bad debt loss before it is transferred to DATEV, this red note message does not appear. Instead of the pRAP postings, only normal postings are then transferred. When the cancellation is transferred, these are ultimately written off again. In this case the accountant does not have to intervene manually.
In the sidebar of the notifications, it is pointed out that a recurring posting has already been transmitted to DATEV for this invoice. This must be stopped and reversed manually by your accountant!
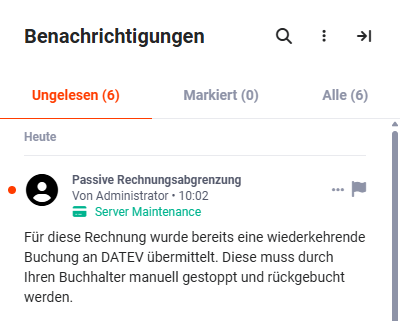 Notifications sidebar - recurring posting already transmitted to DATEV
In the detail view of all invoices with the status “bad debt loss” or “cancelled”, the note “A recurring posting has already been transmitted to DATEV for this invoice. This must be stopped and reversed manually by your accountant.” is displayed.
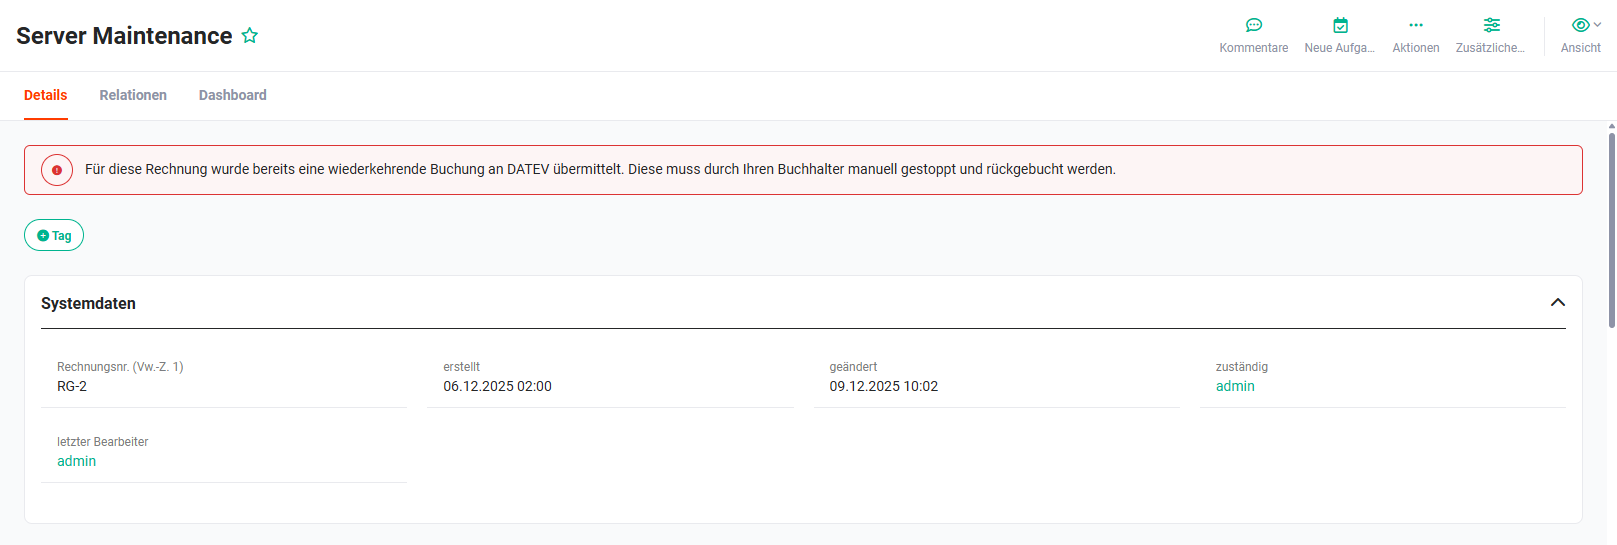 Detail view - note manual correction
4. Practical examples
1 - Transfer complete accounting records to DATEV monthly
Initial situation: A company wants to minimise the effort for the tax advisor and transfer all accounting records including master data automatically and completely from brainX to DATEV - without manual post-processing in the tax firm.
Procedure: In the list view of the Invoices module, all not-yet-posted records of the month are selected. Via the DATEV Buchungsdatenservice action, the preview is optionally checked first and then the direct transfer to the DATEV data centre is started. After a successful transfer, the records in brainX are automatically set to posted.
Result: The tax advisor receives complete, finished accounting records including debtor/creditor master data - without further manual entries. The accounting effort is reduced significantly.
2 - Allocate an annual subscription to the correct period (Deferred Income accounting)
Initial situation: A company issues an invoice in December for an annual subscription that only takes effect from January of the following year. The income is to be distributed correctly for accounting purposes across the associated period.
Procedure: Deferred Income accounting is activated in the settings. The invoice is recorded with the corresponding service period (start/end). During the export via DATEV Buchungsdatenexport or DATEV Buchungsdatenservice, the amount is automatically split to the correct period - the net amount is posted to the accrual account, the VAT remitted separately.
Result: The balance sheet correctly reflects the actual economic situation. MRR, ARR and BWA are realistic key figures - without manual accounting intervention.
3 - Create new debtor master data directly in DATEV
Initial situation: A company regularly gains new customers whose master data previously had to be entered manually in DATEV before an invoice could be posted.
Procedure: The master data of the organization (debtor number, address, bank details, VAT ID etc.) is stored completely in brainX once. During the first export via the DATEV Buchungsdatenservice, the debtor master data is created automatically in DATEV and updated as needed during later exports.
Result: New customers no longer have to be recorded manually in DATEV. The master data is always up-to-date and consistent between brainX and DATEV.
4 - Correctly handle a cancelled invoice with Deferred Income accounting
Initial situation: An invoice for which a recurring DATEV posting has already been transferred must be cancelled subsequently.
Procedure: The status of the invoice is set to cancelled in brainX. brainX then displays a note that a recurring posting has already been transmitted to DATEV for this invoice and that this must be stopped and reversed manually by the accountant. The accountant is informed via the notification sidebar.
Result: Double reversals are avoided. The accountant receives all the necessary information to carry out the correction correctly in DATEV.
5. Frequently asked questions
What is the difference between DATEV Buchungsdatenservice and DATEV Buchungsdatenexport?
The DATEV Buchungsdatenservice action transfers accounting records and master data directly and online to the DATEV data centre - including an optional preview before the transfer. The DATEV Buchungsdatenexport action only generates a ZIP file that can be handed over separately to the tax advisor or used in accounting software. An active access key (token) is required for the direct transfer.
What happens to invoices after a successful export?
After a successful transfer to DATEV, all exported invoices in brainX are automatically set to posted. This prevents these records from being exported, edited or deleted again - audit security is thereby ensured.
Can the DATEV Buchungsdatenservice create and update master data in DATEV?
Yes, in contrast to the DATEV Rechnungsdatenservice 1.0, the Buchungsdatenservice can actively create and update debtor and creditor master data in DATEV. The prerequisite is that the relevant fields (debtor/creditor number, address, bank details etc.) are maintained completely in brainX.
When must Deferred Income accounting be activated?
Deferred Income accounting must be activated when invoices are issued whose service period falls wholly or partly into a future accounting period - e.g. for annual subscriptions or multi-year maintenance contracts. Activation is required by law (§ 250 (2) HGB). If you have questions about the tax classification, it is advisable to consult the tax advisor.
What must be observed for a cancelled invoice with an already transferred DATEV posting?
If an invoice is cancelled or set to bad debt loss after a recurring posting has already been transferred to DATEV, the accountant must intervene manually - the recurring posting must be stopped and reversed in DATEV. In this case, brainX displays a corresponding note both in the detail view of the invoice and in the notification sidebar.
Must incoming invoices be recorded differently when the Buchungsdatenservice is active?
Yes, when the DATEV Buchungsdatenservice is active, the product block in incoming invoices is strictly required. The quick-creation action Record incoming invoice is therefore no longer available - incoming invoices must be created via the normal creation view.